Getting Started with the ZealPC Zeal60 Keyboard PCB

Recently I picked up a Zeal 60 printed circuit board from BC-based ZealPC, and I couldn’t be happier!

The board supports a few layouts for now, though it’s open source, and you can either fork it to add your own, or add a pull request to share with the community.

The first thing you’ll want to do after getting a Zeal60 PCB is to flash it with the “default.hex” file. I used Windows for this, though you can achieve similar results on Linux and MacOS (OSX).

Initial Downloads

  1. Download Java Runtime Environment (JRE) here: http://www.oracle.com/technetwork/java/javase/downloads/jre8-downloads-2133155.html
  2. Download the Atmel flashing utility “FLIP”: http://www.atmel.com/tools/flip.aspx
  3. Grab the most recent Zeal 60 keyboard zip: https://cdn.shopify.com/s/files/1/0490/7329/files/zeal60_v0_3.zip
  4. Unzip the zeal60_v0_3.zip file to your desktop

Install the Driver

  1. Plug in your Zeal60 to your computer via USB
  2. Hit “Windows” and “r” keys together, then type “devmgmt.msc”
  3. Right click the device with the exclamation point next to it
  4. Click “browse for driver”
  5. Navigate to C:\Program Files\FLIP\Drivers
  6. Hit “next”

Flashing the Board

  1. Install the driver –
  2. If you’ve not started assembling anything yet, press the golden button between the “A” and “S” pads on the board (if you’ve already assembled it, unplug it and hold the “space” and “esc” keys while plugging in the USB cable)
  3. Open FLIP
  4. In FLIP, hit connect to the device, and select “ATMega32U4”
  5. Hit “ctrl” + “U” keys to connect to the Zeal 60 PCB
  6. Hit “ctrl” + “L” to load a file
  7. Select the “default.hex” file in the Zeal 60 folder you extracted to your desktop
  8. On the left-hand window, click “Run”
  9. Once completed, then click “Start Application” in the right window

You’re all set!

Outemu Blue JSpacer Jailhouse Mod

This tutorial will cover removing Outemu Blue switches from a TeamWolf Zhuque+ and applying the “Jailhouse Mod” – so-named as it stops the mechanical keyboard switches from “clicking” when depressed. What’s great about this mod is that it also retains the tactile feeling of the switch, and slightly increases the force needed to bottom out.

An interesting side effect was that these switches became very quiet! If there’s interest I can also post a video with a comparison of before and after, and compared to Zealios + Zealencios, Gateron Browns, Gateron Browns + Zealencios. Just leave a comment and I’ll see what I can do  🙂

Note that it took about 6 hours to do this for each switch on the board, though admittedly I was watching a movie at the time, and it was New Years Eve. Also be prepared for some eventual pain in your fingers: Outemu switches are a bit hard to pry apart in this fashion, but I’m open to suggestions for easier methods.

Modding a blue Outemu switch for a mechanical keyboard in order to remove the "click" sound and maintain tactility - Ryan MacLean @ Blandname.com
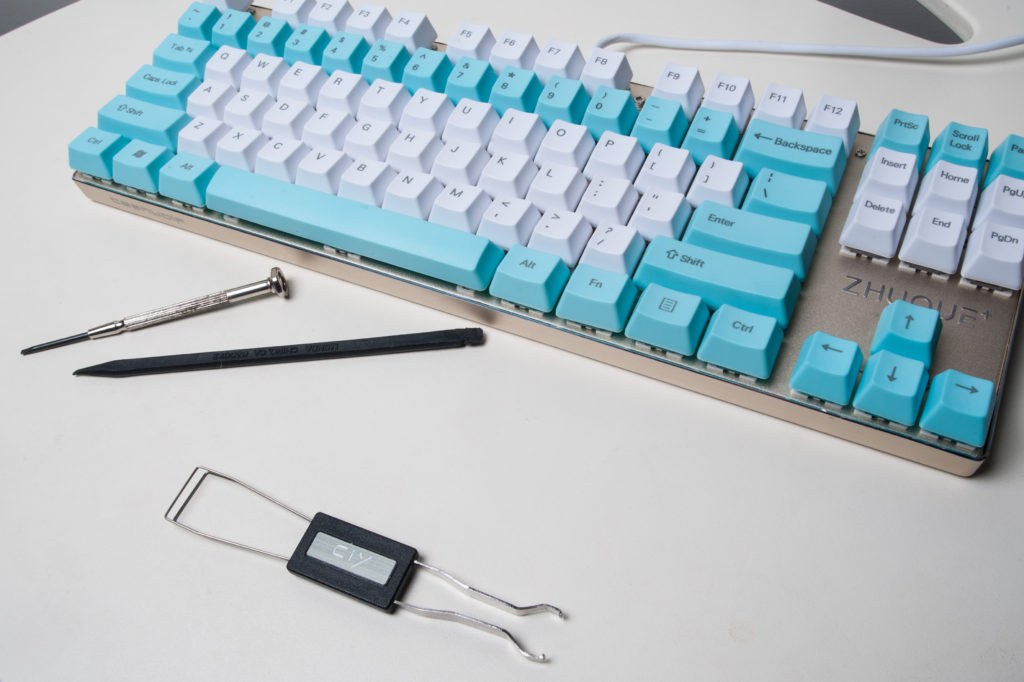
Tools we’ll be using for this tutorial

Tools required:

  • A “spudger” – available at Mac repair shops
  • A 2.5mm size flathead screwdriver
  • A switch removal tool (or a soldering iron, if the board is not hot-swappable)
  • A set of JSpacers from the Van Keyboard

A note about the keyboard used:

Modding a blue Outemu switch for a mechanical keyboard in order to remove the "click" sound and maintain tactility - Ryan MacLean @ Blandname.com
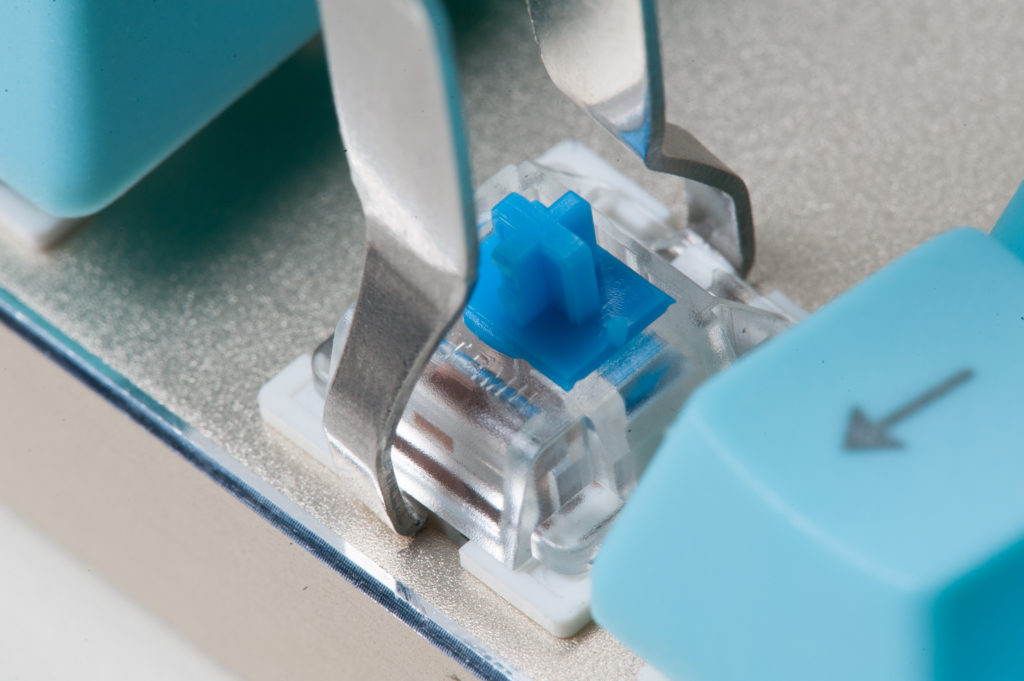
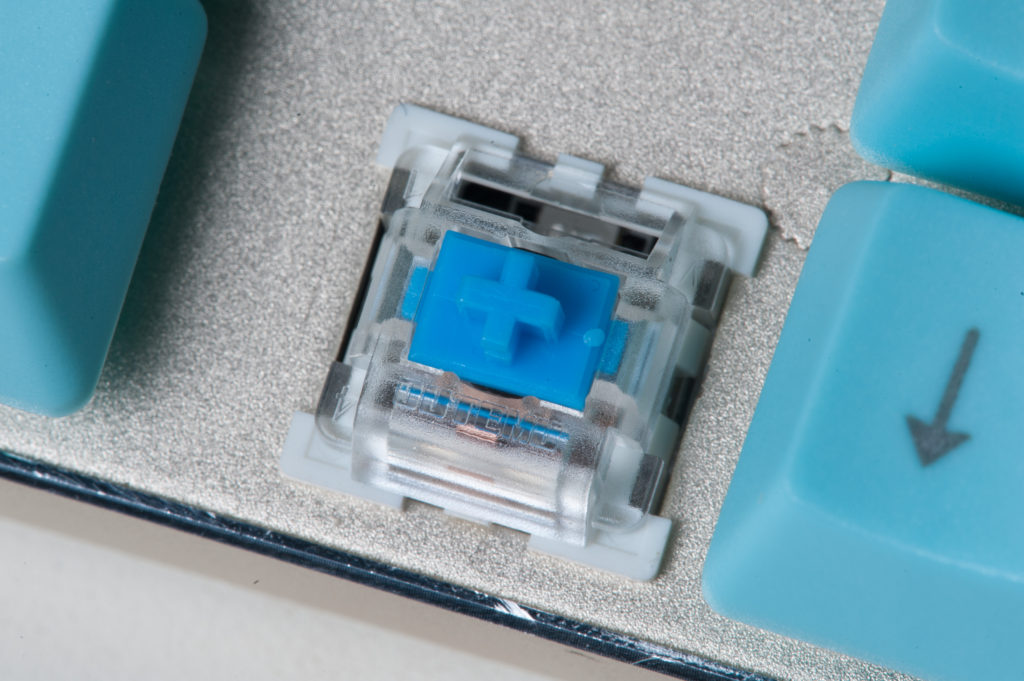
1. Remove the switch from the board using the included switch remover
Modding a blue Outemu switch for a mechanical keyboard in order to remove the "click" sound and maintain tactility - Ryan MacLean @ Blandname.com
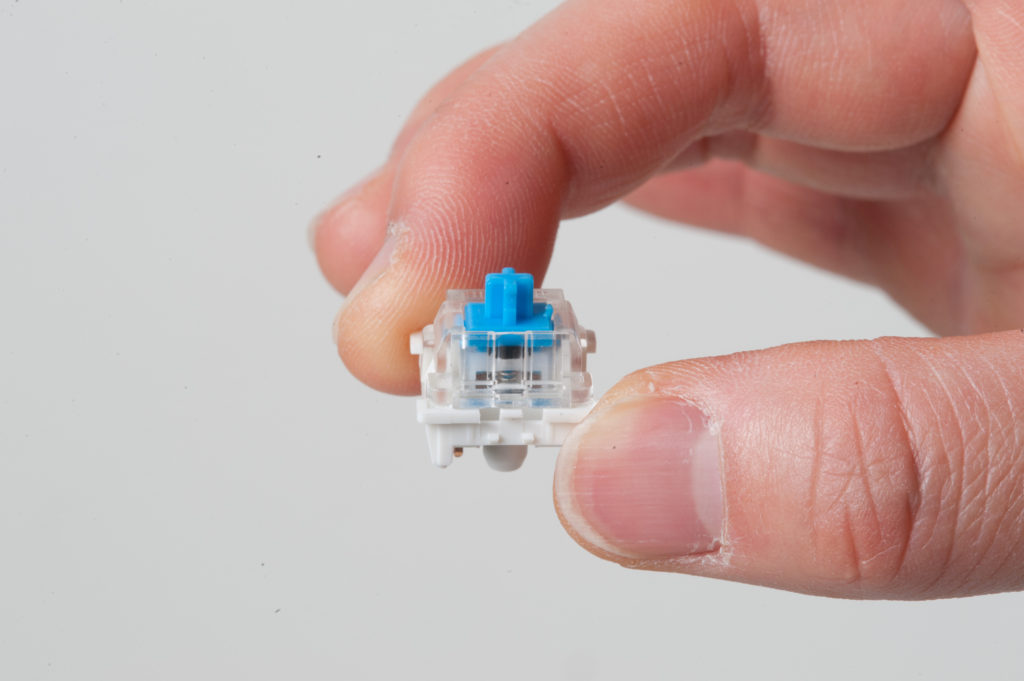
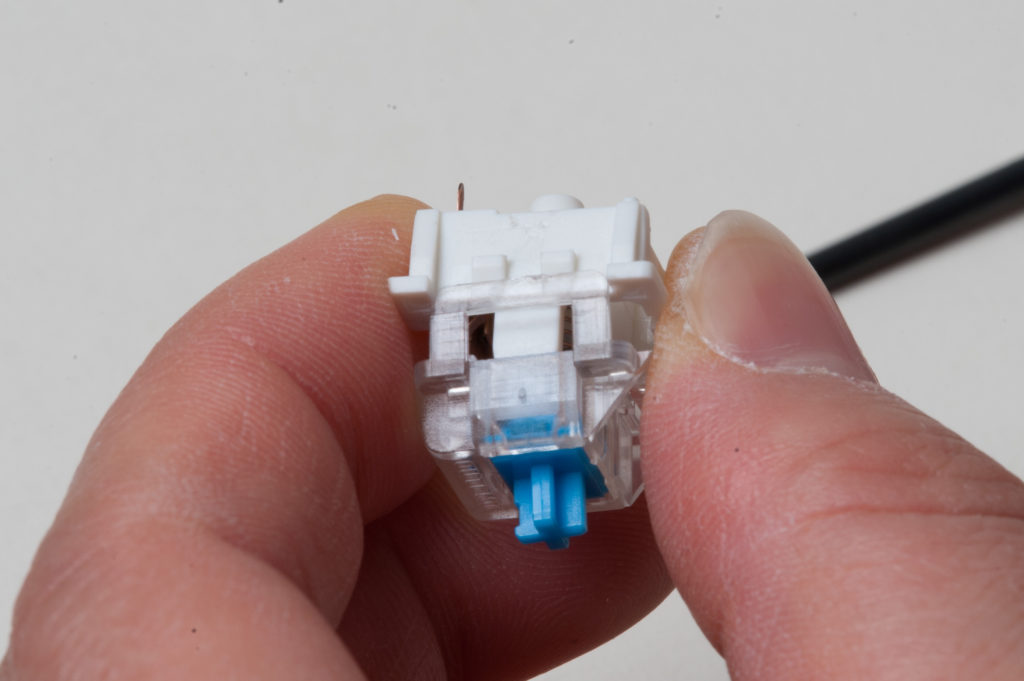
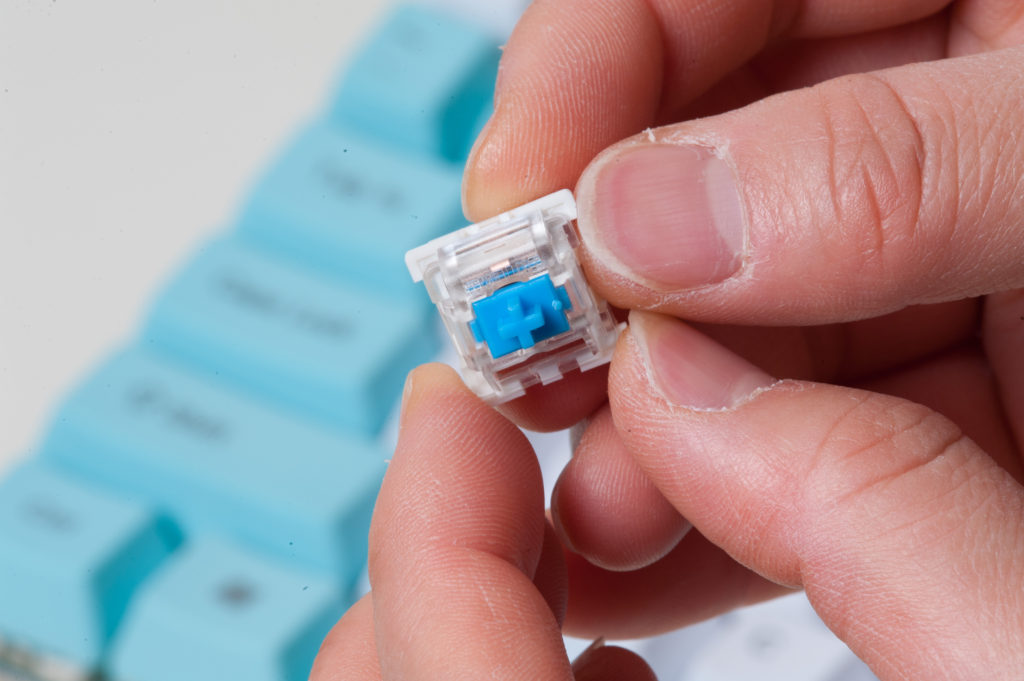
2. The removed switch
Modding a blue Outemu switch for a mechanical keyboard in order to remove the "click" sound and maintain tactility - Ryan MacLean @ Blandname.com
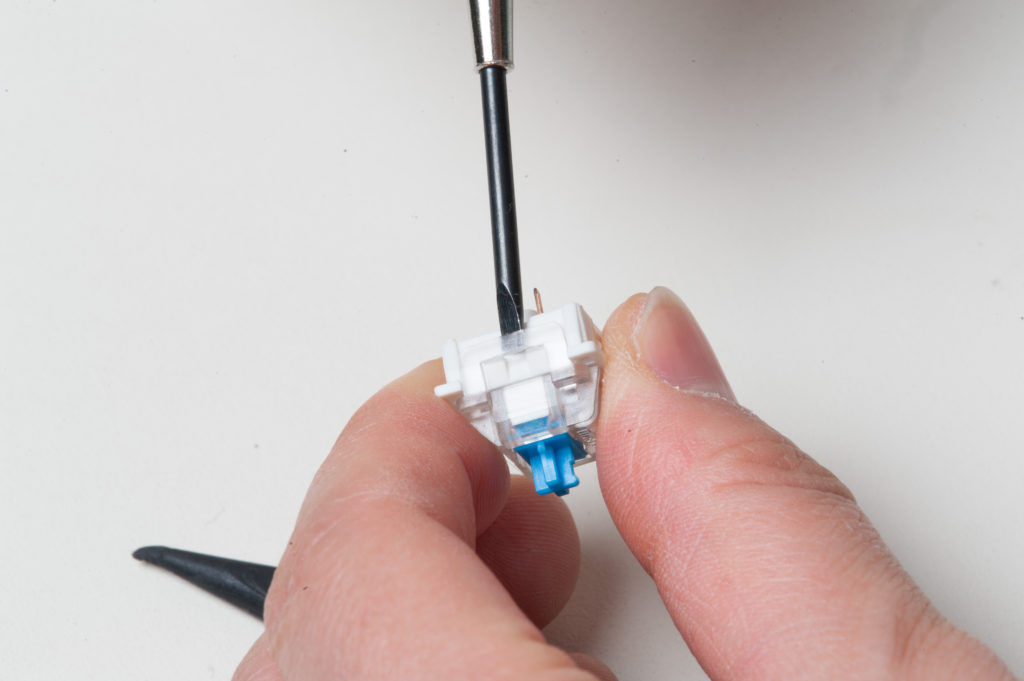
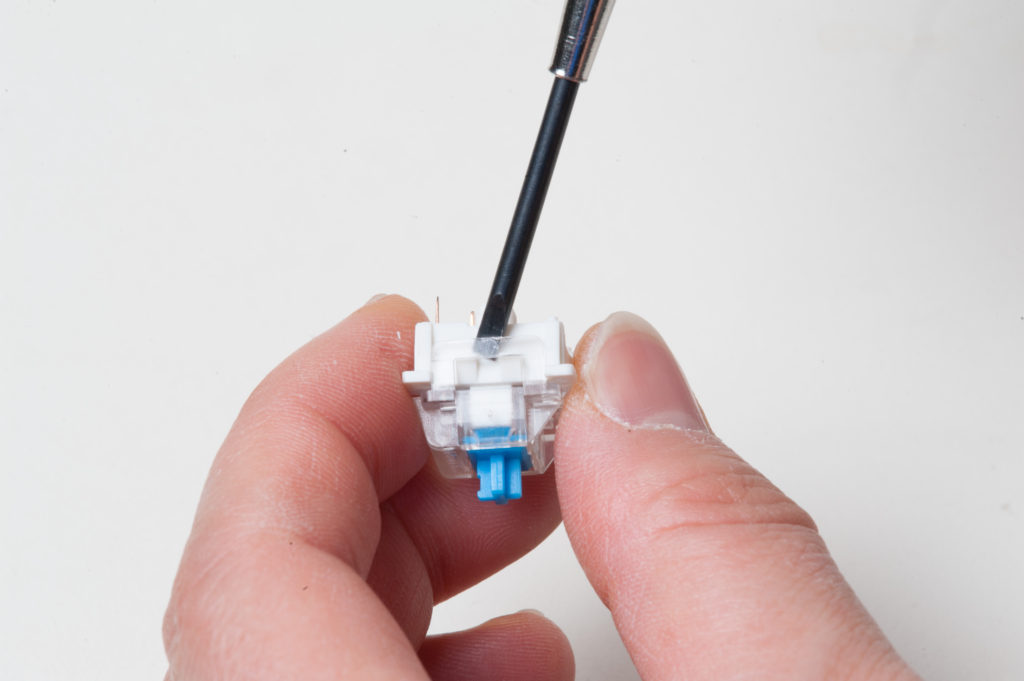
3. Put the screwdriver under the top (clear) part of the switch housing
Modding a blue Outemu switch for a mechanical keyboard in order to remove the "click" sound and maintain tactility - Ryan MacLean @ Blandname.com
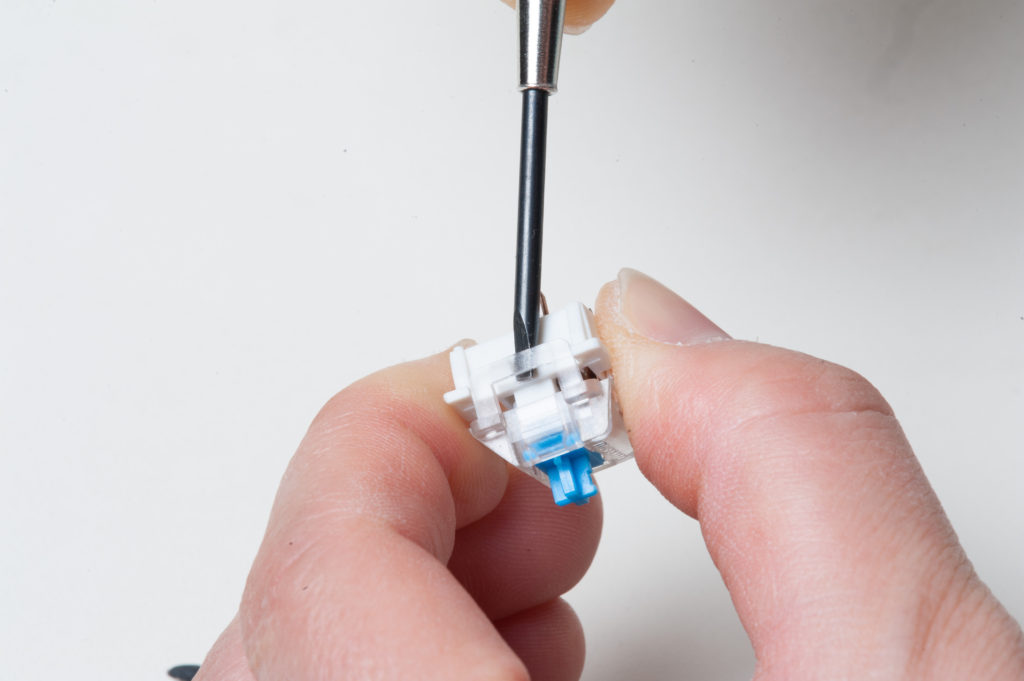
4. Insert the screwdriver into the other side, being careful not to push the lose side back on, and pop the top off the switch housing
Modding a blue Outemu switch for a mechanical keyboard in order to remove the "click" sound and maintain tactility - Ryan MacLean @ Blandname.com
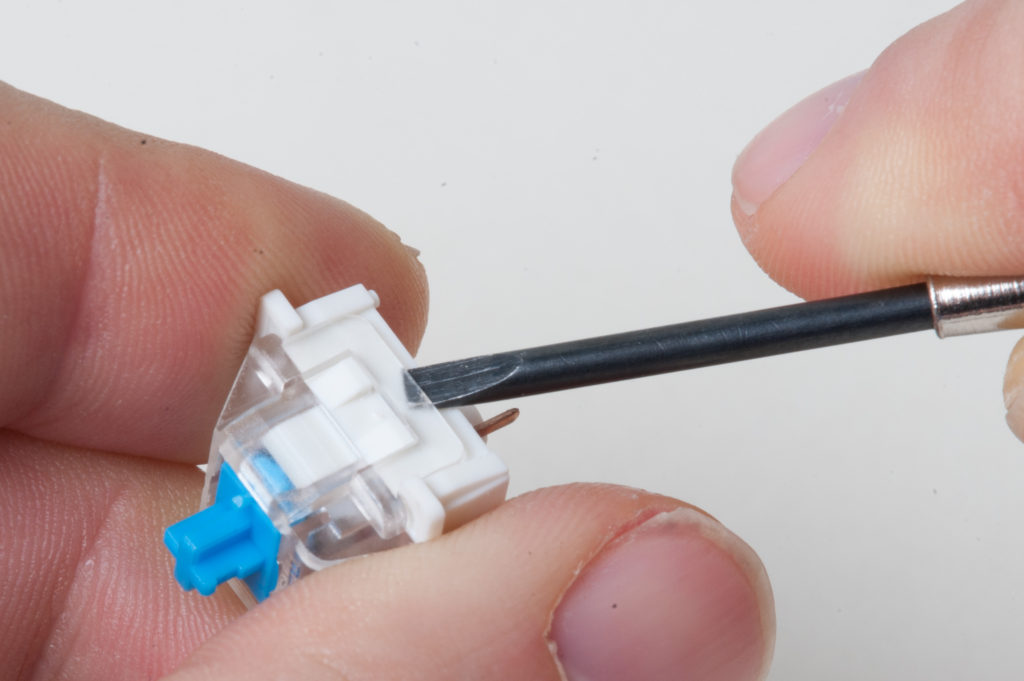
5. Rotate the screwdriver slightly and push in order to get the top of the housing over the retaining clips
Modding a blue Outemu switch for a mechanical keyboard in order to remove the "click" sound and maintain tactility - Ryan MacLean @ Blandname.com
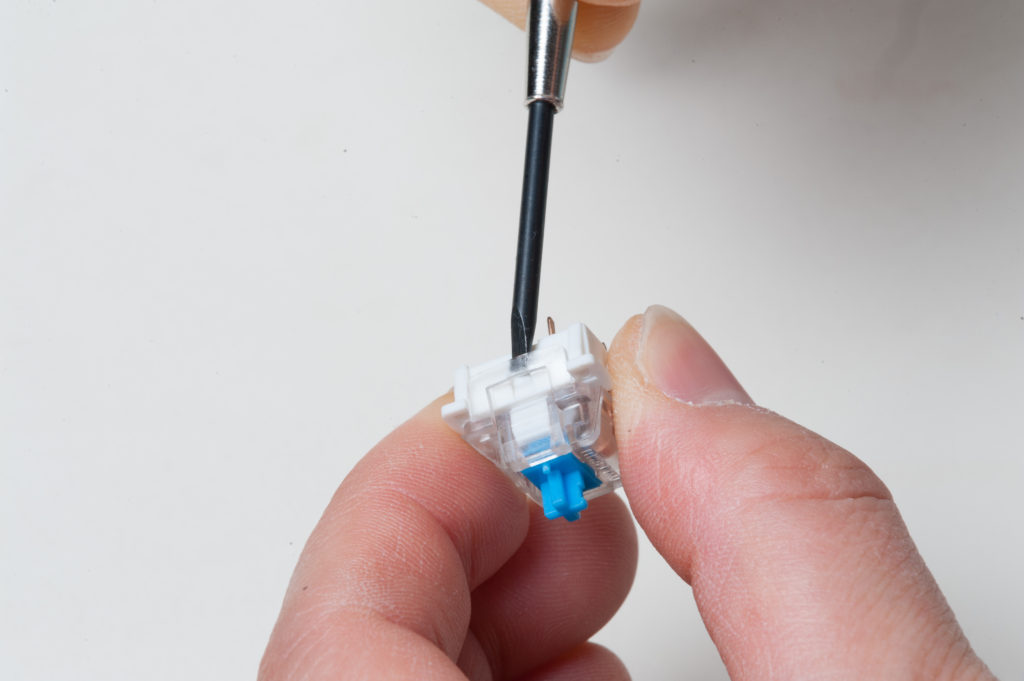
6. Insert the screwdriver slowly at an angle
Modding a blue Outemu switch for a mechanical keyboard in order to remove the "click" sound and maintain tactility - Ryan MacLean @ Blandname.com
7. Place the flat head screwdriver between the top and bottom of the switch housing
Modding a blue Outemu switch for a mechanical keyboard in order to remove the "click" sound and maintain tactility - Ryan MacLean @ Blandname.com
8. As you pop the second side off, make sure to press firmly between the thumb and forefingers as there’s a spring inside just dying to get out!
Modding a blue Outemu switch for a mechanical keyboard in order to remove the "click" sound and maintain tactility - Ryan MacLean @ Blandname.com
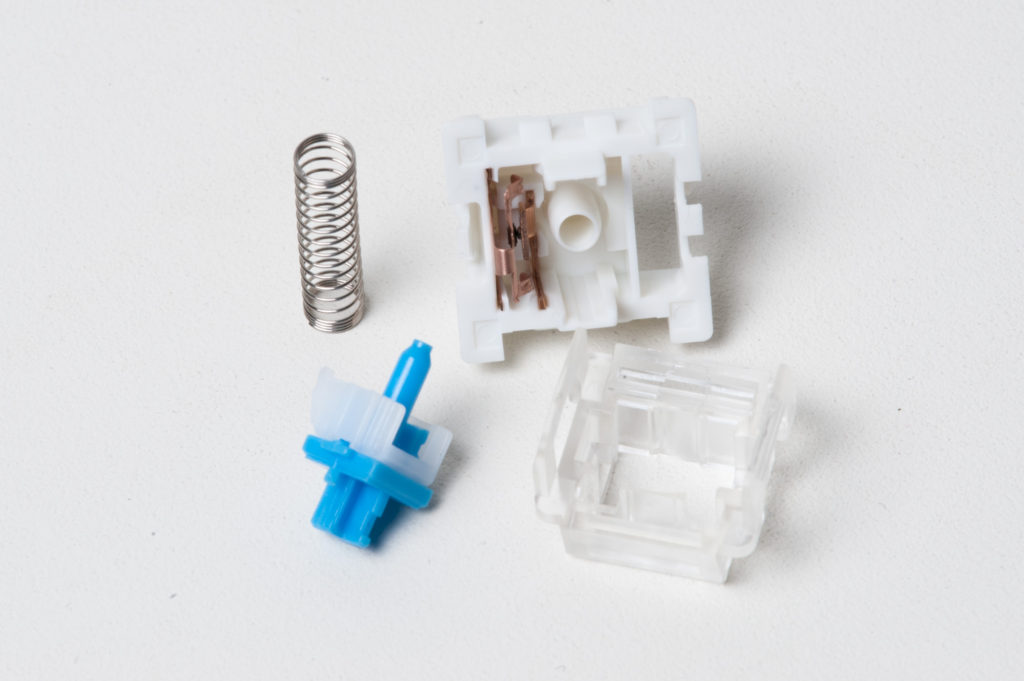
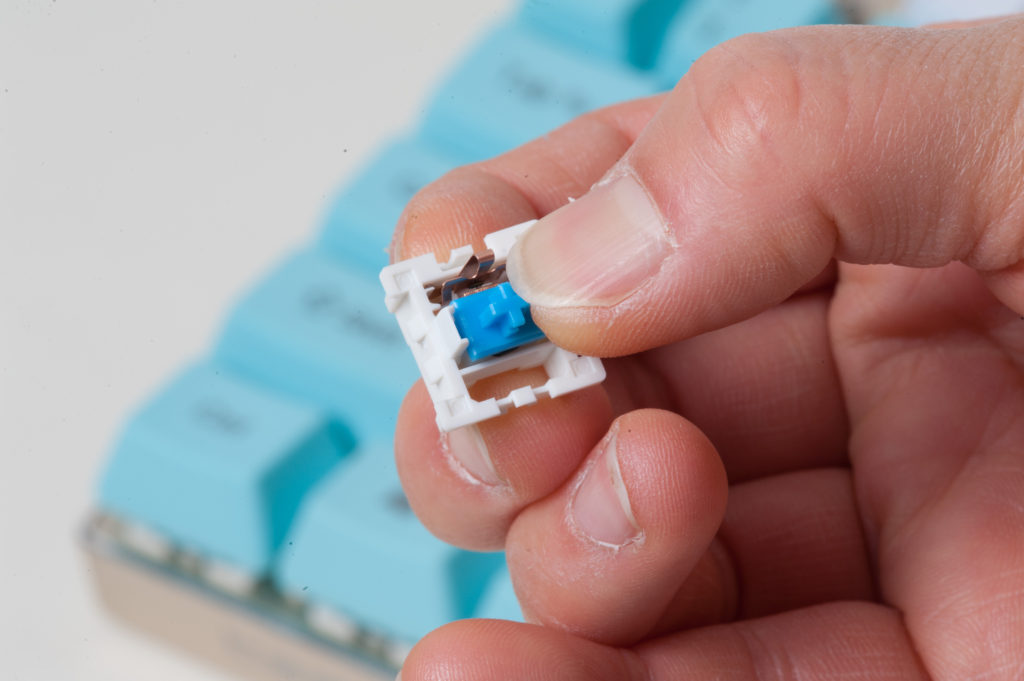
9. A dis-assembled Outemu Blue mechanical switch
Modding a blue Outemu switch for a mechanical keyboard in order to remove the "click" sound and maintain tactility - Ryan MacLean @ Blandname.com
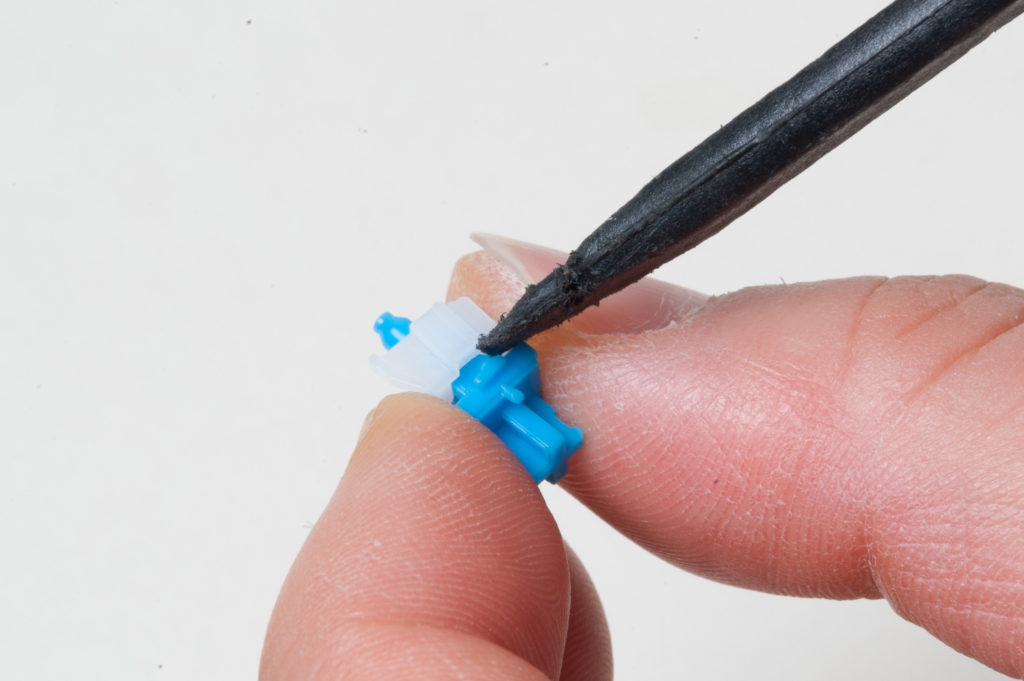
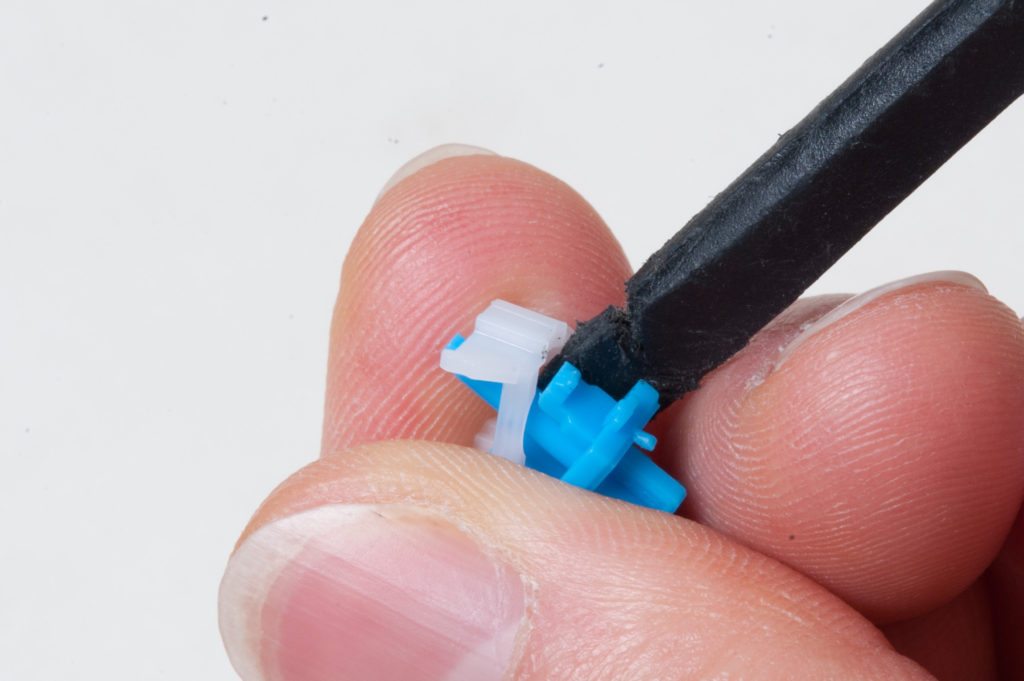
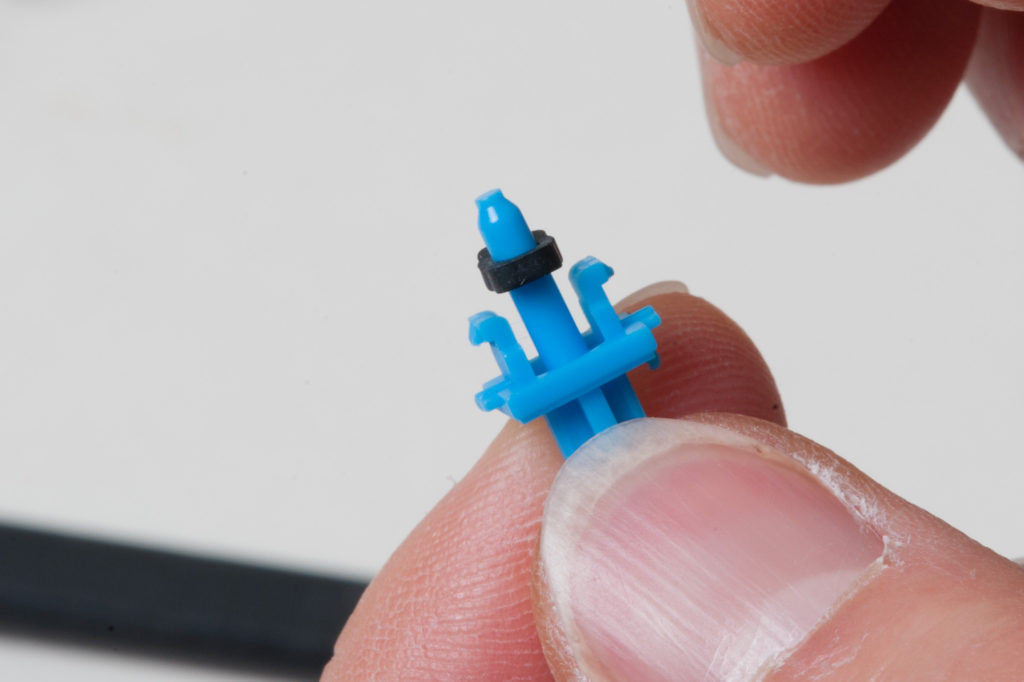
10. Wedge the spudger in the middle of the slider
Modding a blue Outemu switch for a mechanical keyboard in order to remove the "click" sound and maintain tactility - Ryan MacLean @ Blandname.com
11. Gently rotate the spudger to pop the two apart
Modding a blue Outemu switch for a mechanical keyboard in order to remove the "click" sound and maintain tactility - Ryan MacLean @ Blandname.com
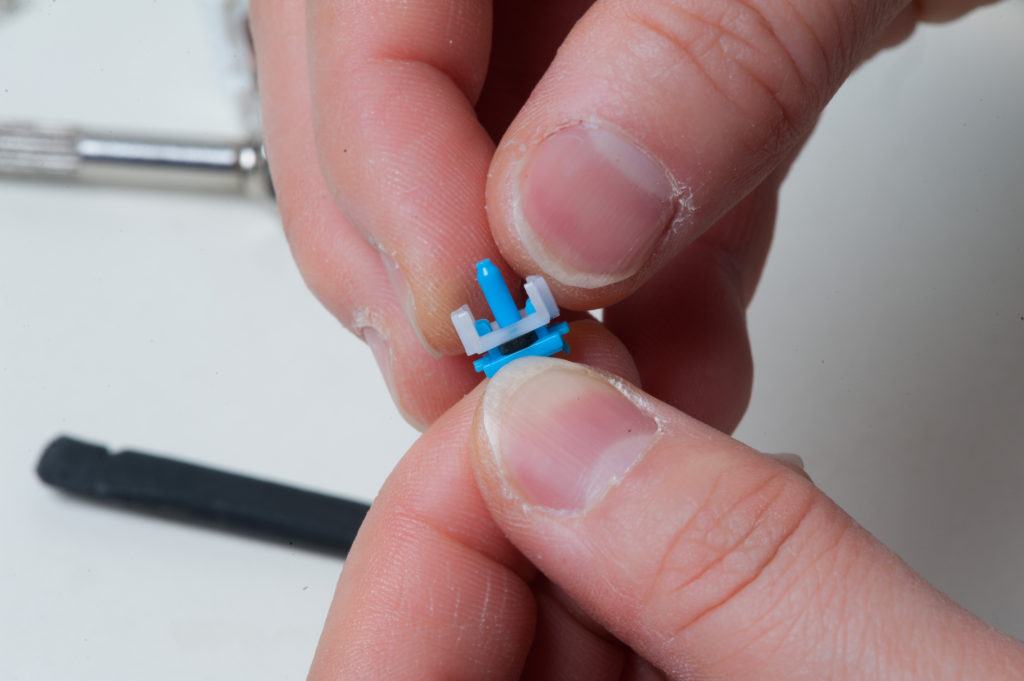
12. Place the Jspacer on the slider, ensuring that the longer edges are rotated to fit between the opening in the stem side clips
Modding a blue Outemu switch for a mechanical keyboard in order to remove the "click" sound and maintain tactility - Ryan MacLean @ Blandname.com
13. Put the tactile white plastic piece over the slider and Jspacer
Modding a blue Outemu switch for a mechanical keyboard in order to remove the "click" sound and maintain tactility - Ryan MacLean @ Blandname.com
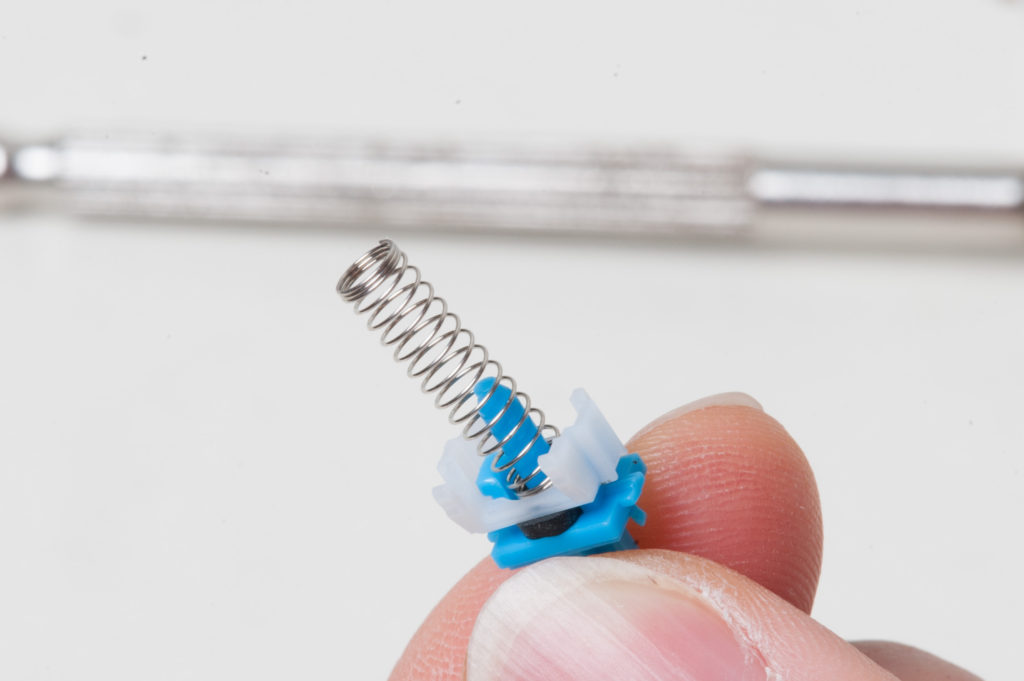
14. Place the switch spring on the switch slider
Modding a blue Outemu switch for a mechanical keyboard in order to remove the "click" sound and maintain tactility - Ryan MacLean @ Blandname.com
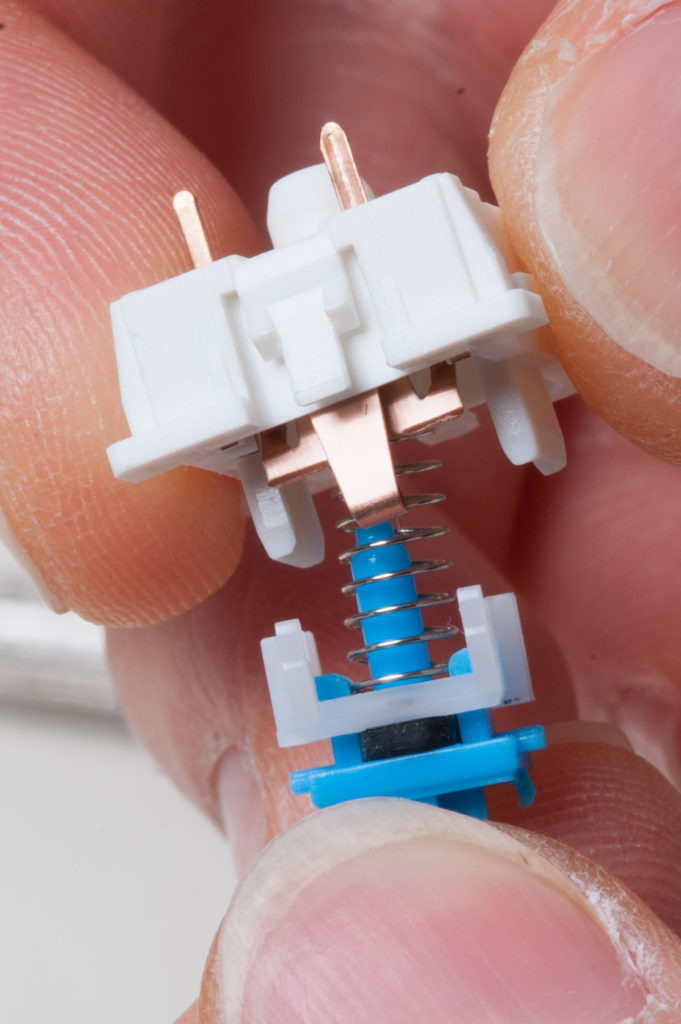
15. Place the spring and slider into the notch on the bottom half of the switch housing, ensuring that the clicking mechanism is facing the switch itself (copper coloured in photo)
Modding a blue Outemu switch for a mechanical keyboard in order to remove the "click" sound and maintain tactility - Ryan MacLean @ Blandname.com
16. Hold the combination of switch bottom, spring and slider together between thumb and forefinger of one hand – you’ll need the other hand free in order to attach the top
Modding a blue Outemu switch for a mechanical keyboard in order to remove the "click" sound and maintain tactility - Ryan MacLean @ Blandname.com
17. Click the top half over the bottom half quicklly and firmly in order to ensure that both sides “click” at once
Modding a blue Outemu switch for a mechanical keyboard in order to remove the "click" sound and maintain tactility - Ryan MacLean @ Blandname.com
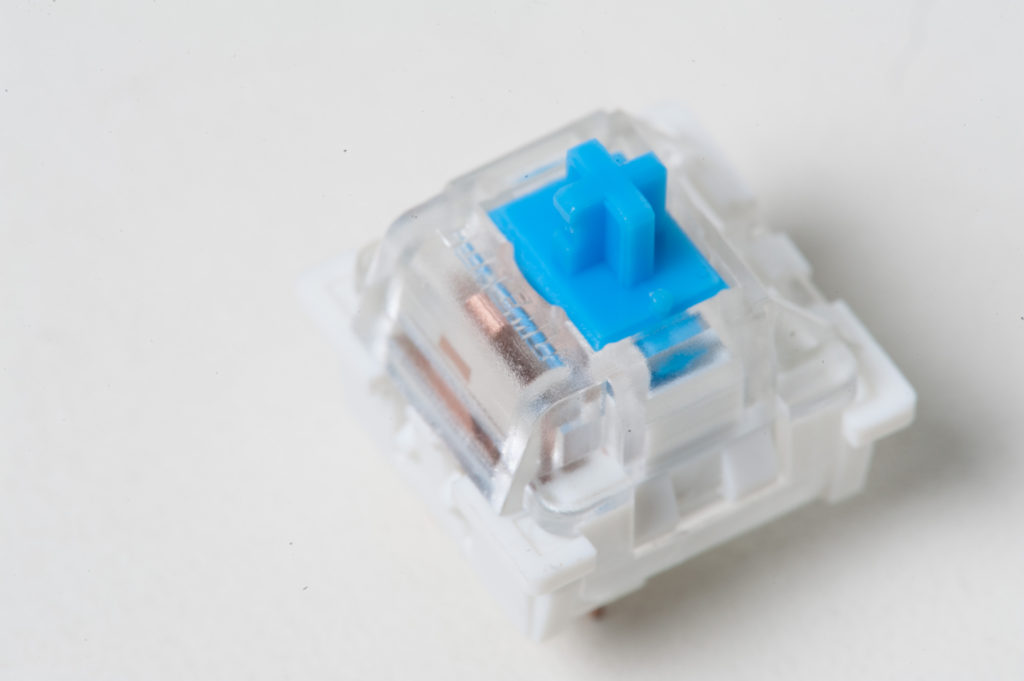
Modding complete! A removed, assembled Outemu Blue switch
Modding a blue Outemu switch for a mechanical keyboard in order to remove the "click" sound and maintain tactility - Ryan MacLean @ Blandname.com
Final Step. Put the blue switch back on the board, then place the keycap back on – you’re done!
Because the beauty dish was already setup, I figured I might as well pay the dog tax! Ryan MacLean @ Blandname.com
Doge. Because the beauty dish was already setup, I figured I might as well pay the dog tax!

Top 10 Virtual Appliances, Revisited

It’s been almost 4 years since I’ve rounded up VMs used on a daily basis, so it’s high time I take another kick at the can and make an update list.

My workflows have changed quite a bit over the years, with more focus being on the Windows side of things. That said, I havent stopped using Linux and still have a keen interest in both storage and management, which should be reflected here.

FreeBSD 9 – I’ve made the switch to this as my go-to server OS. The jails functionality and ports collections are amazing! This could run many of the functions listed herein, but at the very least is a great ZFSv28 test box for the uninitiated.

Astaro –  I’m still using Astaro after all these years, and Sophos purchasing them has not stopped the love. By far the easiest way to start using Squid, Quagga and OpenVPN.

GNS3 Workbench – I use this for testing Cisco configurations on my way to certification. Load up an IOS image, configure, test away!

Nexenta Community Edition – My ZFS primer was done a few years ago using Nexenta, and it is still the easiest way to get into ZFS, so it deserves the nod. The first time you see the speedometers you’ll be in love.

Solaris 11 11/11 – For newer versions of ZFS, you’re stuck with Solaris 11.11.11. You can download this for free, but won’t be able to get support and updates without a license, so I wouldn’t consider it production-ready.

Bactrack 5 – Time to test your wifi security. I’d recommend plugging an Alfa USB wifi device into ESX, sharing the device with the VM and scanning your access point in order to do quick audits.

Windows Server 2008 R2 – Not free, per se, but a good trial that should be enough to get you going on your road to certification. I use the Core install for DHCP and DNS when Windows integration is important.

Citrix XenApp – You’ll need to convert this one, but combined with the developer license, you’ll get 2 concurrent users, include the web access gateway.

Plop Boot Manager – Great ISO for booting and testing USB sticks.

Amahi – Easy as pie mDNS and uPnP autodiscovery. I’ve written about this being a poor Windows Home Server replacement before, but to be fair they get an awful lot right at this point in time.

OSX Lion – A $20 purchase, and well worth it!

Ubuntu LTS - Ubuntu is currently the most popular Linux distribution, can run a wealth of software. Finally took over OpenSuSE as my go-to distribution. The only thing I would mention is that unity does not work so well in ESXi, and if you require the whole desktop experience, you might be better off with Xubuntu or Mint.


Top 10 Chrome Applications I Can’t Live Without

I’ve been trying to become as agile as possible when it comes to personal data in order to be able to run and test any platform of my choosing. To that end, I usually resort to web applications.
That said, Chrome and its open source cousin Chromium can only be run on many (but not all) platforms:
CHROME
  • Windows XP/Vista/2008/7/8
  • Mac OS 10.5.6+
  • Flavours of Linux – Debian, RedHat, OpenSuSE, Ubuntu, Fedora, CentOS
  • ChromeOS
CHROMIUM
  • All of the above
  • BSD: FreeBSD, OpenBSD, NetBSD, DragonflyBSD
  • Solaris and Open Indiana
  • ChromiumOS
  • Gentoo
Unfortunately one OS left out is HP-UX 11i. This is typically a server install, and while I know it’s no excuse, no longer has the mindshare it once enjoyed.
On to the apps!
  • Google Music – free sync for up to 20000 songs. My iTunes replacement that allows offline play for iOS and Android
  • Adblock – A must. I block adverts on everything.
  • Google Reader – It took a very long time for me to get used to the way Google reader works, but it might actually be the best there is at the moment especially considering the aggregation of many feeds into one.
  • Mint – Personal finance application I could not live without.
  • IMO – Goodbye Adium, Pidgin and MSN Messenger! IMO.im is not only a multi-instance web chat client that runs everywhere, it also runs on iOS!
  • Kindle Cloud Reader – Never lose your place. The web client knows where you were on your Kindle, iOS device and syncs it up for you.
  • Google Finance – For stock checking and even watching mutuals. Find out when the next dividend is, sort companies by financials and even display candle graphs.
  • Aviary – Has just surpassed Picnik as my only photo editor, and is now also integrated with flickr. Note that there are many Aviary editors ranging from vector to audio and even video.
  • Netflix Instant Queue – I’m sure you’ve heard of this, but did you also realize that it will resume from PS3, XBOX 360, iPhone/iPad on the web? Outside of the US, we’re not able to use “Instant Queue” but this app brings it back.
  • Offline Gmail – Spotty wifi? Don’t worry, Gmail offline has you covered.
  • Google Voice – This doesn’t get as much hype as it should, but is a great app that can not only make calls for you, but also send SMS.


RSync Files to a Unix/BSD Backup Device from your Mac Laptop

My photo-taking workflow while on vacation usually involves taking a lot of photos daily, dumping them to a laptop, processing, then backing them up once I have returned home.
Previously, I accomplished this manually using BeyondCompare for Windows, as that would run on Windows Home Server.
Since moving to ZFS-based storage, however, this is no longer an option as BeyondCompare only has a Linux client (nothing for Unix/BSD).
There are other ways to get around this:

  • SSHFS and Meld – Complicated, somewhat bloated, but great BeyondCompare alternative
  • *Commander Utilities – Midnight Commander derivatives can accomplish similar tasks using the ctrl+x,d shortcut
  • Rsync – typically installed by default, easy to script

I chose Rsync as I wanted something more automated, but I do find myself using Midnight Commander from time-to-time to simply “get things done” when syncing files other than my images.

Here’s how I did it:

rsync -a -e ssh /volumes/PICTURES/ 'username@mymac:/Volumes/BIGRAID/'

Let’s break this down into smaller pieces:

rsync – this is the command that will do our heavy lifting and file comparison

-a – archive mode

-e – specify an RSH replacement

ssh  – use SSH

/volumes/PICTURES/ – this specifies the “Volumes” folder on my Mac, and the “PICTURES” drive within it. Replace this with the location of your items to backup

 – note the use of single quotes here. We’re using these in case there are spaces in the folder names, and we could have done the same above.

username@mymac - We’re logging on to the host “mymac” with the username “username”. You’ll probably want to change these. I use a hostname here, but you could just as easily use an IP address if you use static IP addresses.

:/volumes/BIGRAID/ – the colon denotes a subfolder on the server we are backing up to, and /volumes/BIGRAID in this case refers to a ZFS pool called “BIGRAID”.

Do you have a similar backup strategy for BSD/Unix targets that you would like to share?

Clear All ZFS Snapshots

If you’ve been running snapshots for a while and have already backed them up, you might occasional need to delete all zfs snapshots for your pool.
Typically, you’d do this as part of your backup script, assuming that they have been written correctly.

First, to find the used snapshot space, run this command:
zfs list -o space
This will give you a detailed readout of your pools and snapshot space used.

Here’s my script to wipe ZFS snap shots, but I am certainly open to suggestion:
zfs list -H -o name -t snapshot | xargs -n1 zfs destroy
Again, caution is needed as this will remove ALL SNAPS from your pools.

ZFS Build Checklist

I’ve decided to replace the Windows Home Server Vail server with something capable of handling newer builds of ZFS and the inherent deduploication.

Here’s a quick kit list and build diary I’ll try to keep up-to-date as I go along.

Kit:

  • Dell Perc6i – this is essentially a port multiplier. I scored it from eBay on the cheap, though it was delivered from Israel, took awhile, and had neither cables nor mounting bracket.
  • OCZ RevoDrive 120GB – Though the RAID controller on this card is not supported in Linux/Solaris, the drives show up as two separate devices as long as you make sure to put it in the right PCIe slot. That means it’s perfect for both ZIL (log) and L2ARC (cache).
  • 2x Intel 80GB X25-M SSDs – these will house the virtual machine files to be deduped. Very reliable drives, and though they might not be the fastest in terms of writes, the speeds are relatively constant which is quite handy compared to solutions that attempt compression like SandForce controllers. ZFS will take care of that, thanks.
  • (IN TRANSIT) 2x Dual Port 1gbit Intel PCIe NICs – I’ll use these for the direct connection to the virtual machine host. Currently one link is used, but when reading from the SSD drives the line is saturated.
  • (IN TRANSIT) 32 Pin SAS Controller To 4x SATA HDD Serial Cable Cord – This is needed to plug in 8 drives to the LSI controller.
  • 5x 1.5TB Seagate hard drives – These will be the bread-and-butter storage running in RAID-Z2 (similar to RAID 6).
  • 3x 3TB Seagate hard drives – These might simply be a large headache, but the plan was to have an extra 3TB RAID-Z2 for backups in another machine. Unfortunately there seem to be issues with drives that are 4k presenting themselves as 512b. I may be able to get around this by hacking or waiting as they become more popular. For now 2 of them are in software RAID1 on a Windows 7 host, and the other remains in the external USB 3 case and is used as a backup drive.
  • NetGear GS108T Switch – A cheap VLAN-capable switch should I decide to use more than 2 bonded ports (I doubt it), currently running the lab.

A Biased Review of Amahi Home Server

The PR-savvy folks at Amahi recently chimed in on the Vail-Fail fiasco by presenting Amahi as an alternative to the Windows Home Server (Vail) solution, and I thought I should give it a run for the money to see how it stacks up.

In short: not well at all.

First, the good things: when configured properly, Amahi offers DLNA/uPNP streaming and the ability to send h264 streams to iPod/iPad/iPhone devices. It also supports backups, disk spanning, remote access, dynamic DNS (*.yourhda.com) and a slew of other features that should have you salivating by now.

The bad? None of it works out of the box.

In order to set up an Amahi server, you must first complete a Fedora 12 install. That’s right, Fedora 12. Not 13 or 14, don’t be confused. Just like most open source software, Amahi suffers from circular dependency issues if you choose the wrong version and the wrong repository – be warned. (Note: if you want to use current versions of Fedora, make sure to change the repository to either f13.amahi.org or f14.amahi.org and realize that there are no plugins for either).

Fedora 12 is a relatively easy install, but when you’re manually setting IP configurations, you lose most of the WHS market in one fell swoop. Fail?

After the install has completed, you logon to Fedora and run the Amahi installer. You’re met with a logon screen. What username and password to use? Pick anything and you’ve just been made an admin. Security by obscurity or brainless UI design? I think it’s the latter.

This install will take almost as long as the Fedora build, which is counter-intuitive. Why not simply chain the install? Why not build a freaking fork that contains Amahi? I’m ranting here, but I find this bit incredibly odd, especially since Amahi has specific OS requirements.

OK, we’ve survived, we’ve realized that eth0 is the only card available to Amahi by now, and through process of elimination we’ve figured out which port Fedora has decided this is.

Huzzah.

Let’s start packing it full of media, eh? We’ll need disks for that, but they are in the case so we should be OK – let’s add a disk to Amahi and let the good times roll. Oh wait, you can’t do that. Why not? It needs to be done via command line. OK, getting the sleeves rolled up is fun once in a while, disks added.

Let’s add some media to the disks. Done. the transfer speed is a good 10% faster than WHS, and 50% faster than Vail. Good news. But you have to use SCP to do it… The Samba sharing doesn’t actually work out of the box (fixed later in Fedora). More fail.

Alright, media is on the device, let’s play some. Pop on the TV, have a look for uPNP or DLNA devices. None. Hmm. Oh yeah, it’s not even added yet.

Civilization 5 Tactics and Strategies

This post will outline and detail strategies, tips, tricks, cheats and tactics for Sid Meier’s Civilization V (Civ5/CivV). Call it an FAQ of sorts.

Let’s get on with it, shall we?

Some quick observations:

  • Open borders allows you to surround an enemy, then attack. This works wonders later on.
  • The trebuchet seems a bit overpowered, and is definitely the best way to attack cities.
  • The easiest way I know of to skip the first intro movie is to simply rename “Civ5_Opening_Movie_en_US.wmv” to something else.
  • Alternatively, edit the “usersettings.ini” file found in “My Documents\My Games\Sid Meiers Civilization 5\”. Make sure to change “SkipIntroVideo=0” to “=1” on line 15.
  • For a copy of the English manual for Civ5, head here
  • How to turn on workers automatically keeping improvements
    In the My Documents folder go to the Civ V folder and then look for the “usersettings.ini” file.

    There is a setting called AutoWorkersDontReplace. Change the value from 0 to 1.

Macbook Pro 15″ i5 Unibody Upgrades

I’ve finally purchased a MacBook Pro, and things are going pretty well. Most of my work these days involves using servers for heavy lifting, but I still use Windows 7 from time to time, and Lightroom 3 almost all the time.

Unfortunately, Lightroom 3’s catalog is essentially a database of photos, and the more you put in it, the more slowly it will run. In this case, the MacBook Pro’s stock 320GB 5400 RPM hard drive just isn’t cutting the mustard. Simple actions like scrolling through images from the last import can be painful. Using Firefox or Chrome while importing makes everything crawl, and I’m forced to look for entertainment in Meat Space. The horror!

I know, “it can’t be that bad” is what you’re thinking. It is. Imports can take up to an hour. While on vacation, the last thing I want to be doing is waiting for imports of photos I’ve already taken while I could be out taking more photos.

I mentioned the fact that I use Windows 7 on the MBP. This is via either Boot Camp or VMware Fusion (running the Boot Camp partition). Things work swimmingly in Boot Camp, but I really have to be careful in Fusion because many of the newer Mac applications are RAM-hungry, and you start paging to disk quickly. Since the disk is so slow, you’re at a standstill within minutes.

So the problem essentially boils down to two things, both of which could have been resolved at time of purchase had I looked into the specs a bit further.

  1. Not enough memory
  2. Hard drive too slow

Costs add up

The memory upgrade, direct from Apple, via their online store, is a whopping $420. The hard drive upgrade from 320GB 5400 RPM to 500GB 7200 RPM is $158. Together I would have shelled out $578 in order to get the system where I think it needs to be.

Enter the Apple Technician

In the not-so-distant past, I repaired Apple laptops for a certified depot. It used to be pretty difficult as some of the Mac laptops had an inordinate amount of screws of varying sizes and dizzying teardown diagrams. I would say I was competent, but it really wasn’t something enjoyable. That said, I have been out of the game for a bit, and things have seemingly gotten much easier for the majority of Apple laptops. Often, you can simply remove the bottom case to gain access to wireless cards, Bluetooth, SuperDrive, hard drive and memory. And such is the case with the Macbook Pro 15″ i5.

Using the diagrams found at iFixIt, I was able to confirm that only a little bit of work would be needed to perform the upgrades. That means I save money on labour, which isn’t cheap.

Price Comparison

I was able to source hard drives at the 500GB capacity ranger running at 7200RPM for very cheap. I’d be looking at around $80, worst case. But being spoiled on other computers running solid state drives, I thought I should look into the option of adding an SSD instead. Though they have come down in price, getting larger capacity SSD drives can run upwards of $400 easily. Ouch. I decided to settle on one of Seagate’s newly-released “hybrid” drives that combine 4GB of superfast SSD with 500GB of traditional rotating platter storage. This should hopefully give me the best of both worlds. The cost? About $140. That’s definitely a few dollars less than the “off the shelf” Apple price, though it’s also double the cost of a typical 500GB 2.5″ hard disk. But speed is the issue to address, and I’m confident the HDD will address that. My only concern will be the speed of the platters may produce noise.

The memory for a MacBook Pro i5 is slightly harder to find. It took some poking around to find the exact speed and latency of the chips, as I want to make sure the logic board won’t complain, and no unforeseen issues would be introduced. After looking at Kingston’s website, I was able to deduce that the full specifications of the RAM are as follows:

  • Format – 204 pin SODIMM
  • Speed – PC3-8500 / DDR3 1066MHz
  • Latency – 7-7-7-20

This is not cheap memory. We’re talking high speed, high density, low latency RAM. After searching high and low, I came across some Mushkin RAM that was Mac certified. I wasn’t even aware that Mushkin made Mac certified RAM, but boy was I happy. The cost for an 8GB pair of 4GB SODIMM modules was only $260! In case you’re interested, the part number is “996644”, and I still don’t see a better deal from ANY vendor for memory this fast with timings this tight. Even for PC.

Our current total is sitting at $400. That’s less than even the RAM would cost from Apple.

Going Forward

Not to miss any opportunities, I decided to go one step further. Removing the memory and hard drive would leave me with spare parts. These could be sold on Craigslist locally for cheap, or I could re-use them. Use for the hard drive is pretty easy: Time Machine backup. A $20 external AcomData 2.5″ Ruggedized Samurai enclosure would fit the bill well, but the last thing you want to do on vacation is lug around cables and accessories. In my experience, they either get lost or forgotten (or both). This may not be the case for everyone, but I actually rarely use optical media. My data is transferred using USB sticks if I need to sneakernet, over wifi or LAN if I need to backup (and again to another location off-site to be safe) and when I do make audio “mixtapes”, it’s not often as I use an iPod for music.

So here I have a useless device taking up space in the laptop. Some digging, and looking at the tear-down told me a 2.5″ hard drive could fit in there easily. Excellent, a use for the old drive that takes up no extra space! Of course, like many good ideas I think I have come up with first, someone had “been there, done that” before, and you can buy full kits online for cheap. I found two companies that sell these: MCE and OWC. I opted for OWC because I really don’t have a need for the external optical drive that MCE throws in for “free”, creating a $20 difference in price as I have a Lacie DVD-RW already. Cost of this part: $80. (MCE’s is around $100 if you still might need that SuperDrive)

The total now sits at $480. More than the cost of the RAM, but still considerably less than the over $700 cost to have Apple do this at time of purchase. If you had messed up and bought the lower-end 15″ i5 Macbook Pro, there would also be at least an hour of labour on top. Typically that would run about $150.

I’m left with 2x 2GB DDR3 SODIMM modules, which might be hard to get rid of at any price, though they make a good upgrade for Mac Mini users. I’ve looked high and low for DDR3 SODIMM “RAMDisks” to no avail. I realize these aren’t the best devices, and never really had a following, but it would certainly be handy to have on one of the servers. One can only dream, I suppose.

So there you have it, cheap upgrade, easy install, no regrets. Preliminary testing tells me that the boot time has been halved, and Lightroom is much faster, though it’s not as fast as running it on my Mac Pro with SSD.

At some point I will probably look at replacing the second internal drive with a solid state boot drive when I replace the Intel X25-M G2 80GB in the Mac Pro with a SandForce SSD, and I will make sure to post some speeds when that frabjous day finally arrives.