Or perhaps I’ve been rediscovering the repos I’ve starred, readme-patched (I’m SORRY!) and probably otherwise drive-by-commited to over the years.
Woah. Things have changed a bit.
Entire whatever model and harness you use these days and point them at a codebase, they can generally do a pretty good job of explaining the ins and outs of code, and it feels pretty good to be able to think about code and then check your assumptions immediately.
The tea command comes into play when you want to quickly file an issue to come back to – instead of an agent memory, a project to-do. Sometimes… often over-zealous but if told to leave a bullet list of conclusions about the codebase, that’s something you can use elsewhere.
You don’t need something the size of a microwave, and it doesn’t need to be an M4 Mac mini, though they are certainly handy.
I’ve been using Raspberry Pis, the 4 and up, specifically (the 3b+ has a use! a topic for a later NetBSD post).
Tiny little nodes that can run a harness, Ollama, and point to the cloud, giving me evals, experiments, traces and spans that let me then test the code – what a concept! – and deploy it to a tiny fake “gas town” fleet to run on.
Of course the first thing I reached for was IRC. This is Colloquy on a Mac, asking one of the agents about temps. You don’t need a cl4w for this, and though I’m not recommending vibe coding anything to do with irssi in public, for an offline ergo server and a few clients, it’s pretty low-overhead.
Customizing Azure Cloud Shell with Zsh and Fish for use with Terraform, Git and Kubernetes
We’ll go over customizing your Azure Cloud Shell in a way that helps you get things done on a daily basis in vim, git, terraform and kubernetes.
Azure Cloud shell is super handy because you can get to it over the web, it stores your settings, and if set up correctly, can allow for resumable sessions!
Note that you can also load it from VS Code / VS Codium in the console area – which we’ll cover at the very end <3
Custom Browser Font
First, you’ll need a proper font for your browser. In my case, Chromium at the moment, but Firefox is similar. Essentially we’ll be adding a patched font to the browser so that we can use it when we’re in the web version of Azure’s Cloud Shell. I use Nerd Fonts, but there’s also Powerline fonts. If you need something to help make up your mind: NerdFonts are generally larger in memory but also contain many more symbols. Powerline fonts are smaller.
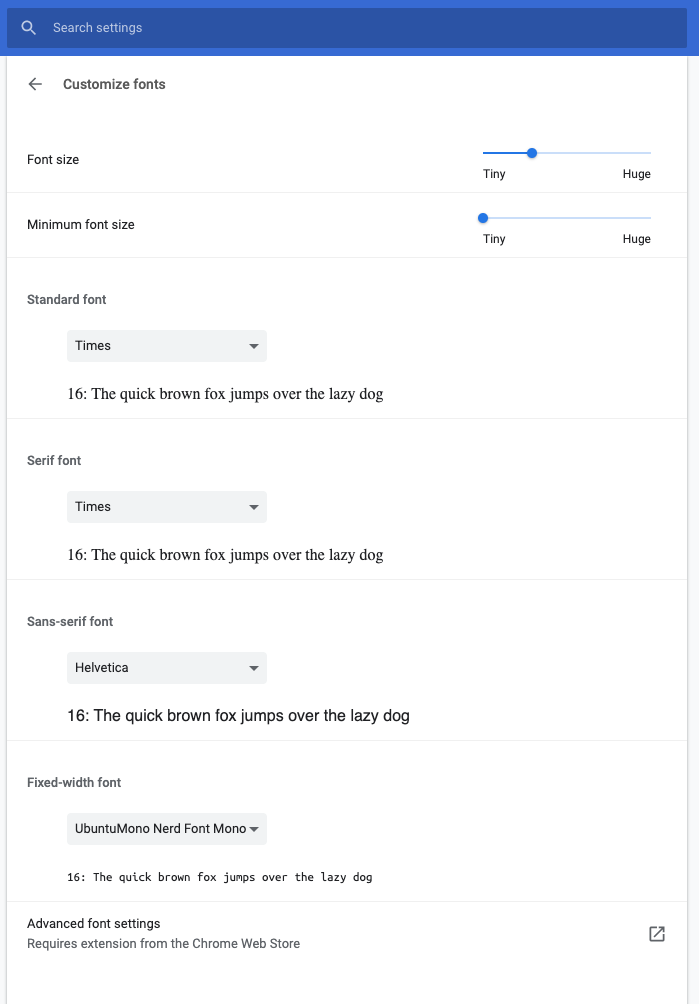
In chrome://settings/fonts set the monospaced font to your downloaded patched font. You can try a few if you feel like the symbols aren’t great. I use Ubuntu Mono.
Chrome font settings screen:
Chrome Font Settings Screen Shot
Selecting Ubuntu Mono from the list:
Ubuntu Mono Font Selection Screenshot macOS 10.15
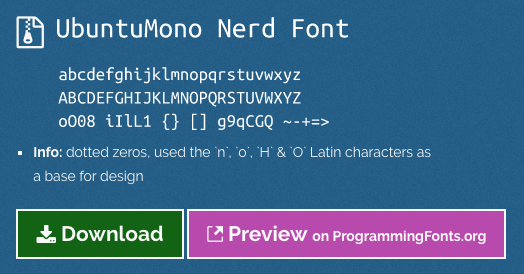
Ubuntu Mono Screenshot from nerdftons.com
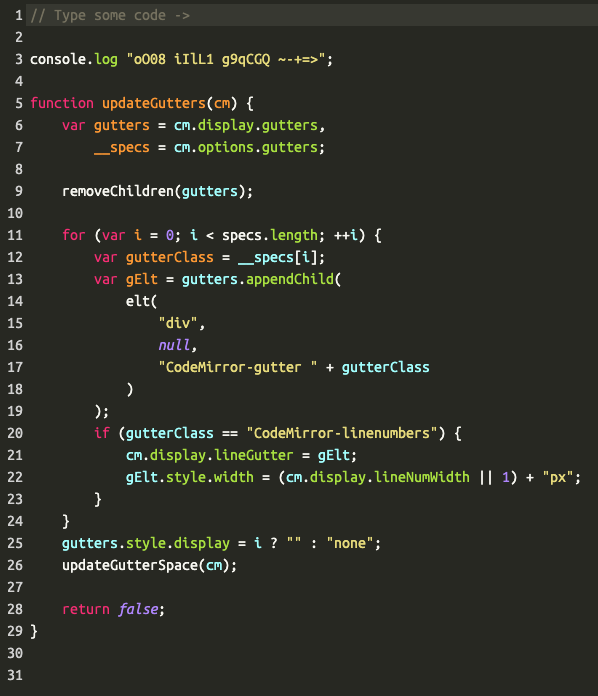
Preview of Ubuntu Mono:
Ubuntu Mono Font Preview From https://app.programmingfonts.org/#ubuntu
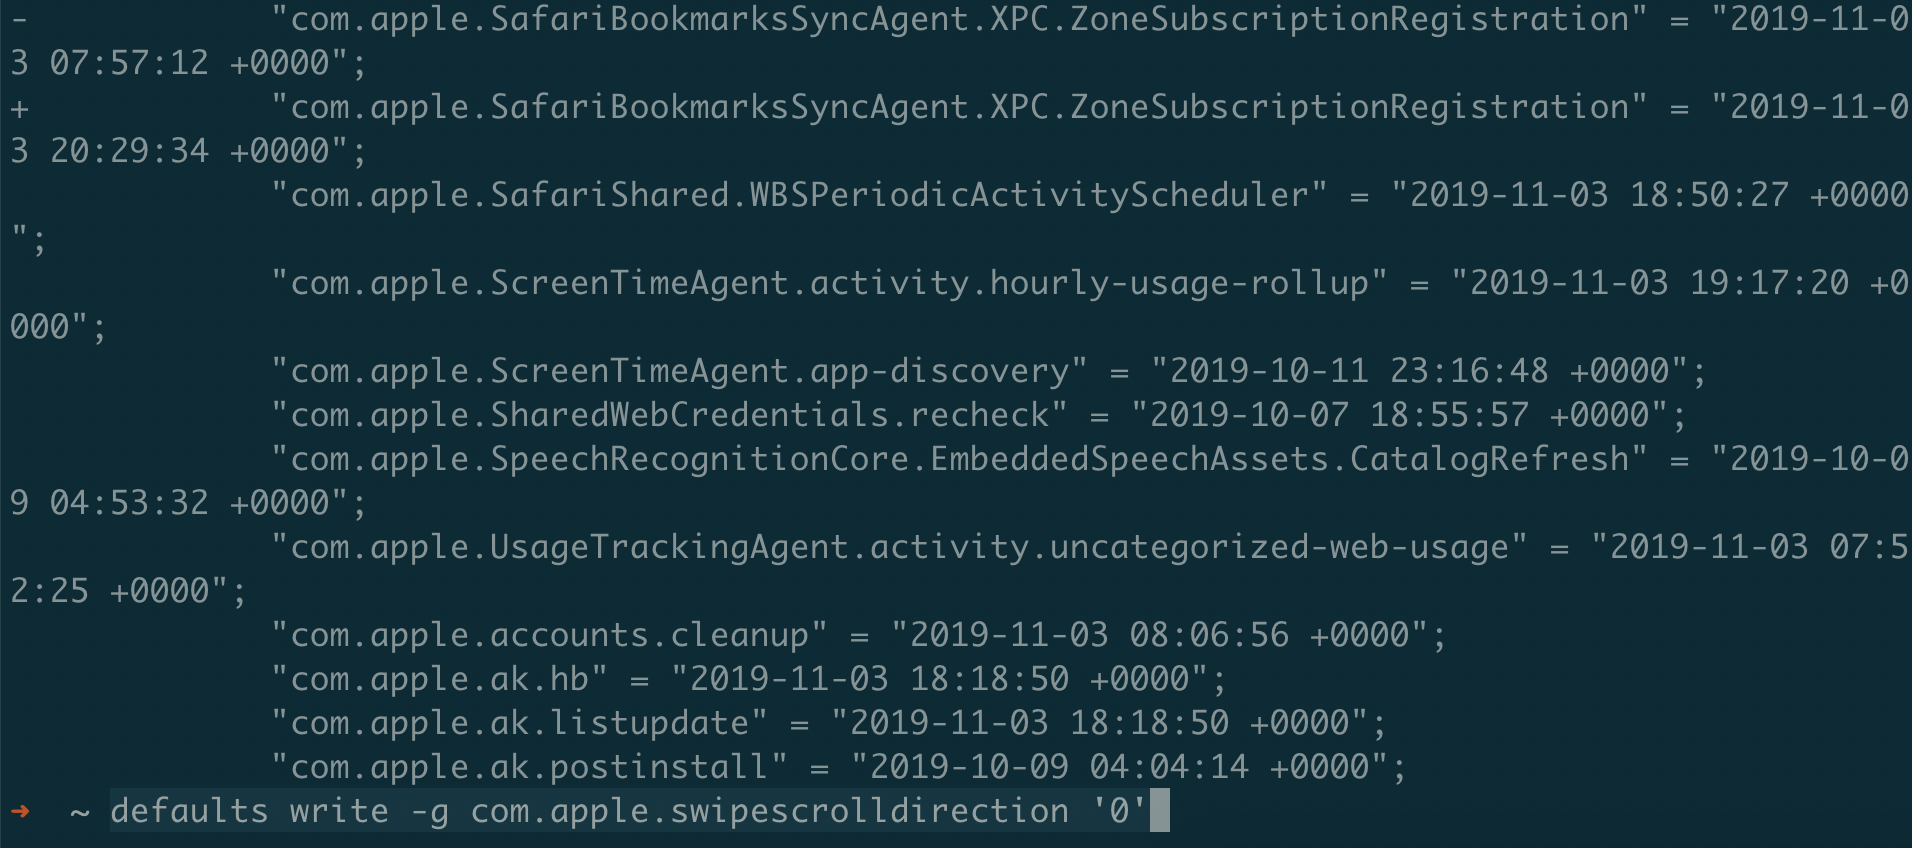
Test your new font with:
curl https://raw.githubusercontent.com/ryanoasis/nerd-fonts/master/bin/scripts/test-fonts.sh | bash - | more
Linuxbrew / Homebrew
Now let’s install homebrew with:
sh -c "$(curl -fsSL https://raw.githubusercontent.com/Linuxbrew/install/master/install.sh)"
sh -c "$(curl -fsSL https://raw.githubusercontent.com/Linuxbrew/install/master/install.sh)"

==> This script will install:
/home/linuxbrew/.linuxbrew/bin/brew
/home/linuxbrew/.linuxbrew/share/doc/homebrew
/home/linuxbrew/.linuxbrew/share/man/man1/brew.1
/home/linuxbrew/.linuxbrew/share/zsh/site-functions/_brew
/home/linuxbrew/.linuxbrew/etc/bash_completion.d/brew
/home/ryan/.cache/Homebrew/
/home/linuxbrew/.linuxbrew/Homebrew
==> The following new directories will be created:
/home/linuxbrew/.linuxbrew/bin
/home/linuxbrew/.linuxbrew/etc
/home/linuxbrew/.linuxbrew/include
/home/linuxbrew/.linuxbrew/lib
/home/linuxbrew/.linuxbrew/sbin
/home/linuxbrew/.linuxbrew/share
/home/linuxbrew/.linuxbrew/var
/home/linuxbrew/.linuxbrew/opt
/home/linuxbrew/.linuxbrew/share/zsh
/home/linuxbrew/.linuxbrew/share/zsh/site-functions
/home/linuxbrew/.linuxbrew/var/homebrew
/home/linuxbrew/.linuxbrew/var/homebrew/linked
/home/linuxbrew/.linuxbrew/Cellar
/home/linuxbrew/.linuxbrew/Caskroom
/home/linuxbrew/.linuxbrew/Homebrew
/home/linuxbrew/.linuxbrew/Frameworks

Press RETURN to continue or any other key to abort
Some fun output, note the portable ruby:
==> Downloading https://linuxbrew.bintray.com/bottles-portable-ruby/portable-ruby-2.6.3.x86_64_linux.bottle.tar.gz
######################################################################## 100.0%
==> Pouring portable-ruby-2.6.3.x86_64_linux.bottle.tar.gz
==> Homebrew is run entirely by unpaid volunteers. Please consider donating:
  https://github.com/Homebrew/brew#donations
==> Tapping homebrew/core
Cloning into '/home/linuxbrew/.linuxbrew/Homebrew/Library/Taps/homebrew/homebrew-core'...
remote: Enumerating objects: 5155, done.
remote: Counting objects: 100% (5155/5155), done.
remote: Compressing objects: 100% (4952/4952), done.
remote: Total 5155 (delta 48), reused 300 (delta 6), pack-reused 0
Receiving objects: 100% (5155/5155), 4.37 MiB | 0 bytes/s, done.
Resolving deltas: 100% (48/48), done.
Checking connectivity... done.
Tapped 3 commands and 4933 formulae (5,196 files, 13.6MB).
Already up-to-date.
==> Installation successful!

==> Homebrew has enabled anonymous aggregate formulae and cask analytics.
Read the analytics documentation (and how to opt-out) here:
  https://docs.brew.sh/Analytics

==> Homebrew is run entirely by unpaid volunteers. Please consider donating:
  https://github.com/Homebrew/brew#donations
==> Next steps:
- Install the Homebrew dependencies if you have sudo access:
  Debian, Ubuntu, etc.
    sudo apt-get install build-essential
  Fedora, Red Hat, CentOS, etc.
    sudo yum groupinstall 'Development Tools'
  See https://docs.brew.sh/linux for more information.
- Configure Homebrew in your ~/.profile by running
    echo 'eval $(/home/linuxbrew/.linuxbrew/bin/brew shellenv)' >>~/.profile
- Add Homebrew to your PATH
    eval $(/home/linuxbrew/.linuxbrew/bin/brew shellenv)
- We recommend that you install GCC by running:
    brew install gcc
- Run `brew help` to get started
- Further documentation:
    https://docs.brew.sh
Warning: /home/linuxbrew/.linuxbrew/bin is not in your PATH.
Once done, we’ll need to fix the path: echo 'eval $(/home/linuxbrew/.linuxbrew/bin/brew shellenv)' >>~/.bashrc && . ~/.bashrc
If all went well, we should be able to run brew and see the following:
brew
Example usage:
  brew search [TEXT|/REGEX/]
  brew info [FORMULA...]
  brew install FORMULA...
  brew update
  brew upgrade [FORMULA...]
  brew uninstall FORMULA...
  brew list [FORMULA...]

Troubleshooting:
  brew config
  brew doctor
  brew install --verbose --debug FORMULA

Contributing:
  brew create [URL [--no-fetch]]
  brew edit [FORMULA...]

Further help:
  brew commands
  brew help [COMMAND]
  man brew
  https://docs.brew.sh
brew install terraform ansible azure-cli ripgrep exa bat fzf zsh fish tmux mc curl coreutils
Git
Now we can proceed to add the tools we’ll need. I’ll try to categorize them so that you don’t end up with stuff you don’t want. Remember: though this can be your primary console with some work-arounds, most likely you’ll want to make this set up portable in your dotfiles and sync things via git. We’ll start there:
You can see from the prompt we’re in the master branch!
Git bash Prompt With Branch in PS1
Sample git prompts (oh-my-fish and oh-my-zsh are defaults, rainbowbrite used for bash-it, in order):
Custom Shells
I’d recommend not modifying the bash shell too much as it’s our default, and there’s no way to change it at present. Similarly, though we can install a new bash shell version, we need to chain-load it in order to have it auto-load. That being said, you probably won’t need a bash that’s up to date at this point.
Other helpers
For the Fish fan: Oh-my-fish (make sure fish is already installed via brew install fish)
curl -L https://get.oh-my.fish | fish
For the original zshers, or those that are ok with the new macOS default: oh-my-zsh (note: changing the default shell will fail because we don’t have a password 🙂 )
sh -c "$(curl -fsSL https://raw.github.com/ohmyzsh/ohmyzsh/master/tools/install.sh)"
This is perhaps the first thing I do on all OSX machines: set the scroll to match my Linux and Windows computers.
No judgement call as to which way is “right”, I’m simply used to this by now, and instead of changing it on two other operating systems, scripting it on only one seemed easier.
While this looks very similar to previous iterations, I found my old scripts no longer working on OSX 10.15 for a host of settings and preferences. Note: I had to logout to make this work.
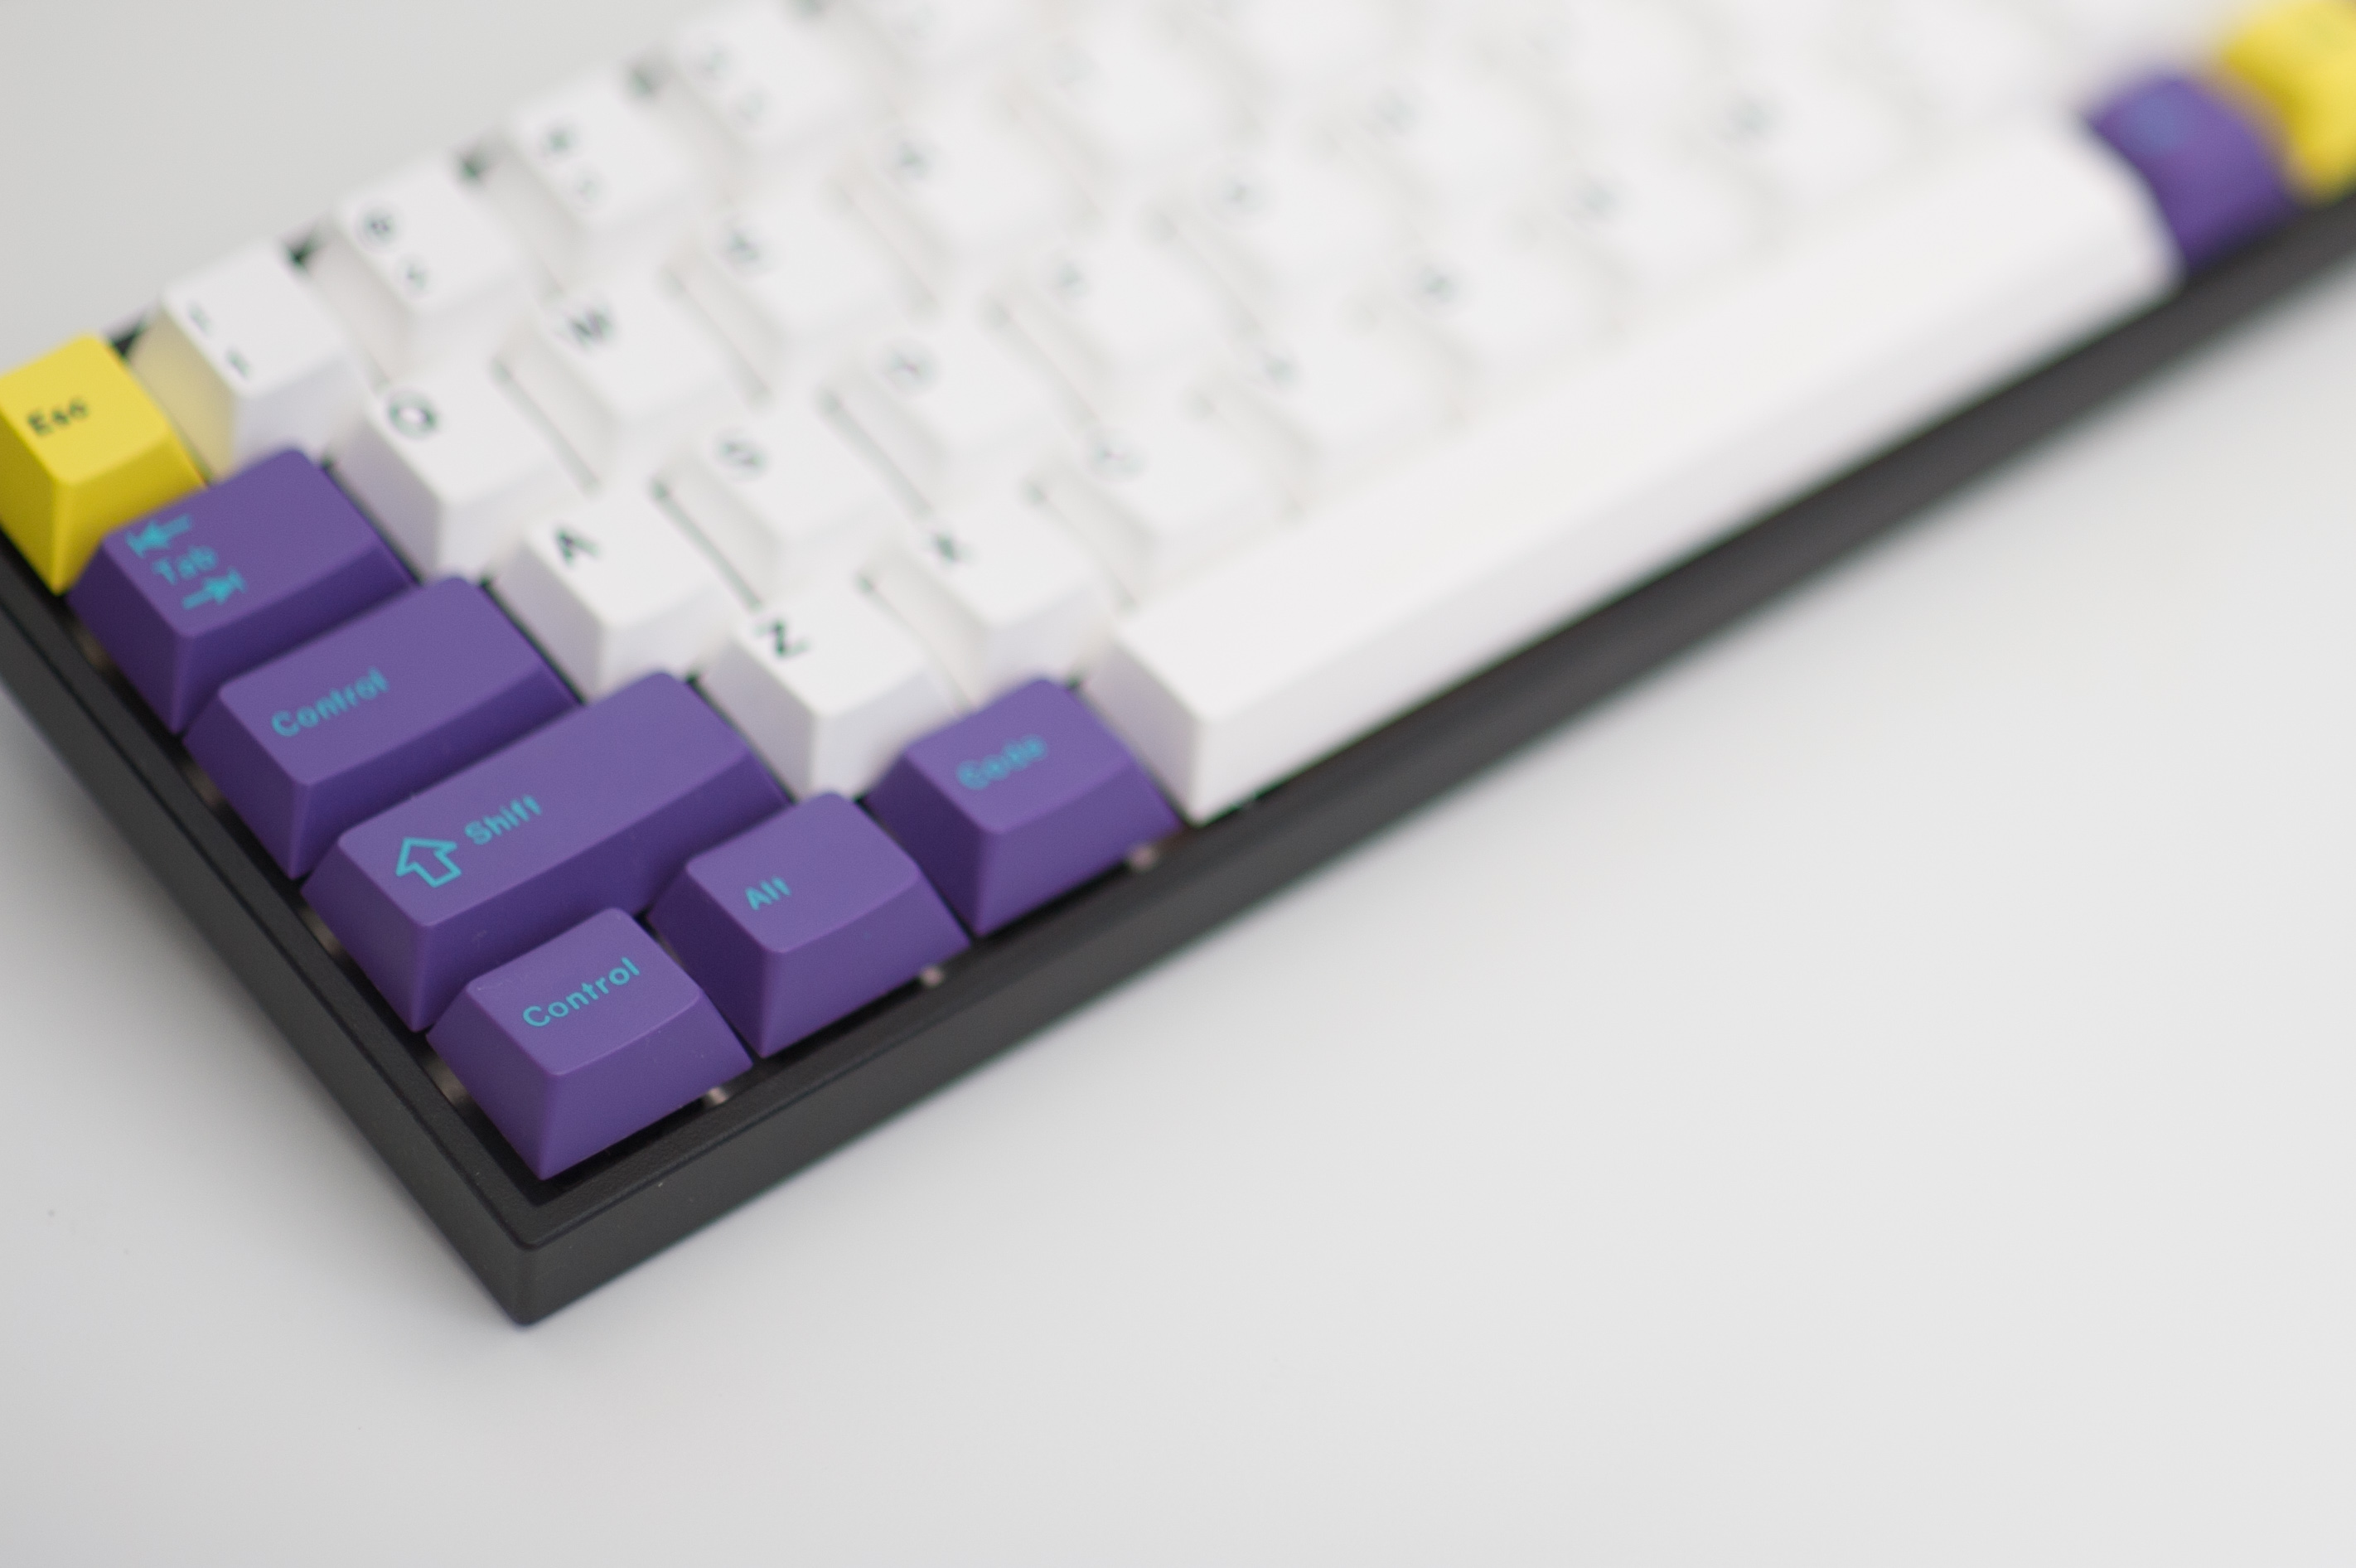
Interesting name for a “Tada 68” board, but it looks like this has a non-programmable PCB, unlike the “Saber 68” (new Tada 68).
That being said, it has most of what you want aside from the ability to set up function combos to send the four-key keyboard shortcuts.
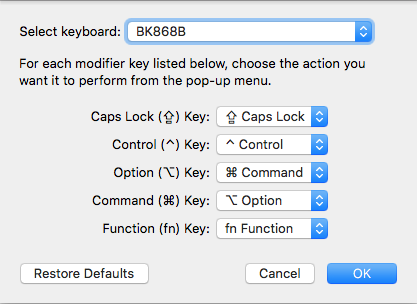
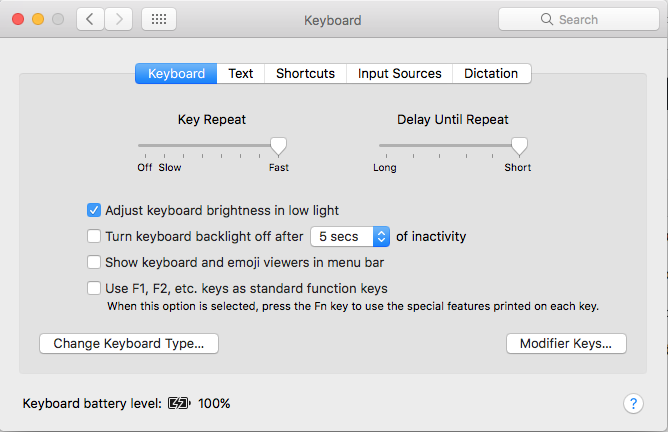
The easiest change is the alt/Windows key swap resulting in Command and Alt, which can be done in “Settings”, “keyboard”, “modifier keys”, then select “BK868B” (this cannot be renamed AFAIK, though you can give it a bluetooth device identifier, more on that a bit later 🙂 ).
Settings required to set up option/alt and command/win keys for macOS.
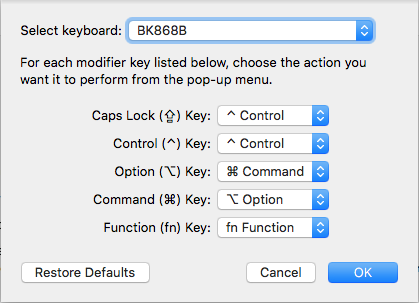
If you have a keyset with a control labelled “caps lock” key, you can optionally set the “caps” modifier to “control” in the settings as well while you’re here:
Tada 68 Pro caps lock to control modification for Apple macOS (OSX)
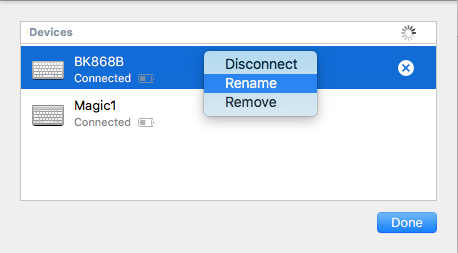
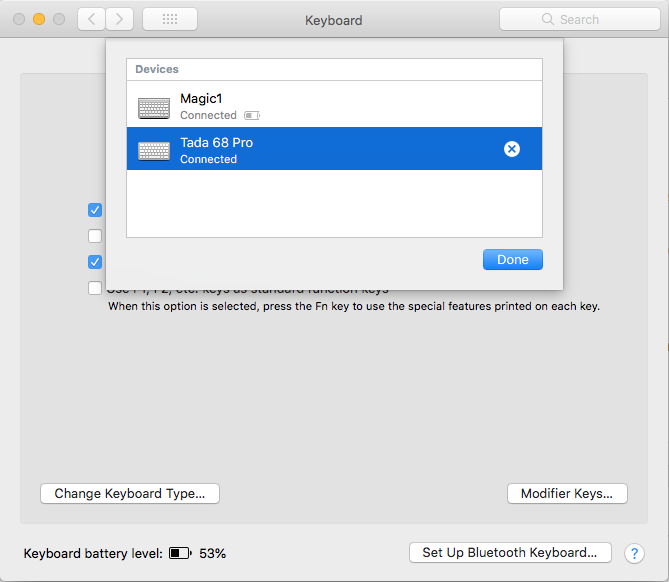
Now we can also rename the device to something more recognizable, via “setup bluetooth keyboard”, then selecting it from the keyboard list:
Renaming a BK868B Tada 68 Pro Akko MaxkeymacOS renamed Tada68Pro BK868B Apple Keyboard
Now that we have it selected and renamed, we unfortunately don’t get battery levels, but it’s actually quite functional.
Bonus for Keyboard Maestro Users
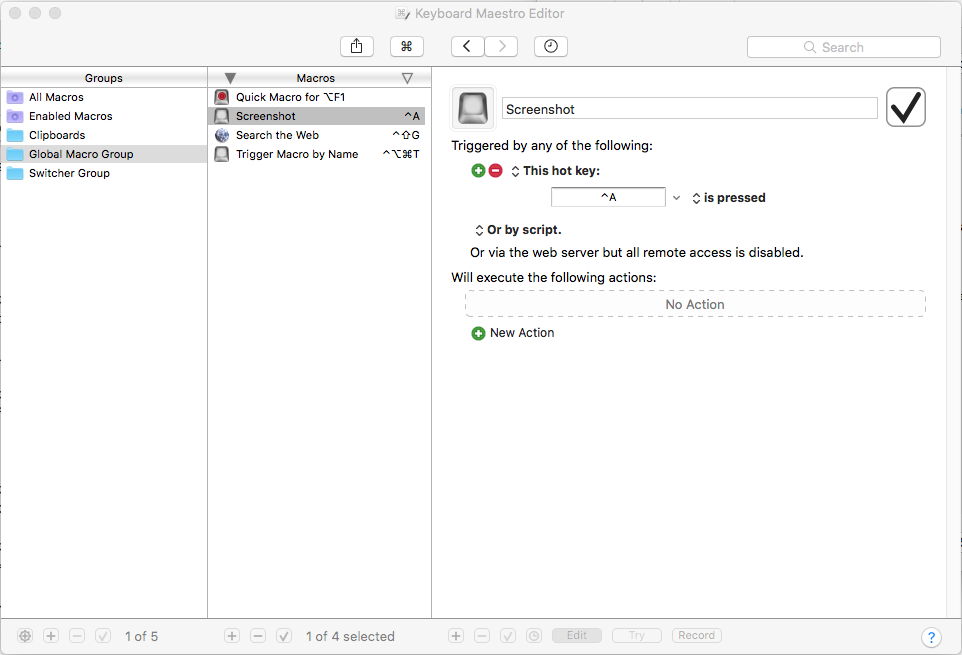
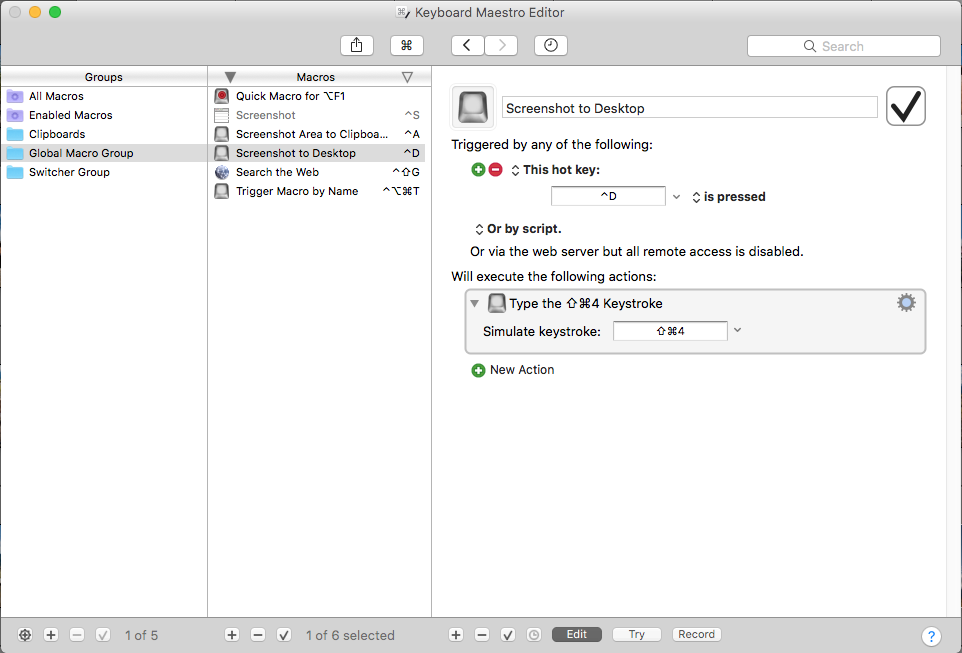
If you want to setup desktop screenshot, area screenshot and area screenshot to desktop keys, and have set the caps-control swap above using Keyboard Maestro (or are OK using that far-away control bottom left, or on the far right, there are a couple of controls):
Here we’ll set up “control-a” where you’d hold control, and press the a key at the same time to grab a screenshots of all of your screens (or just the one if you’re on a laptop with an external monitor):
Setting up screenshot macros in Keyboard Maestro on macOS
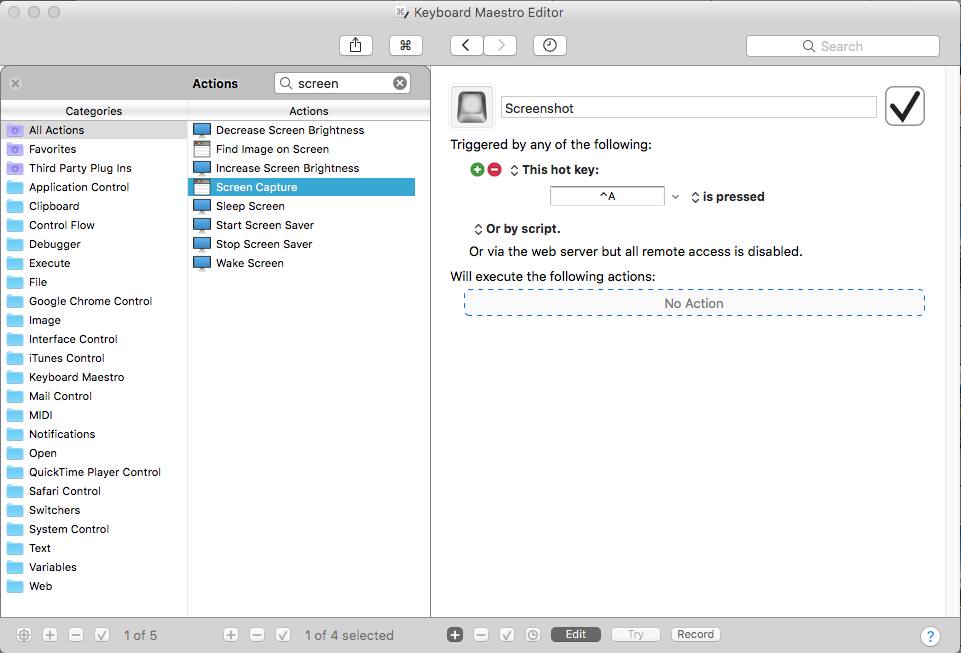
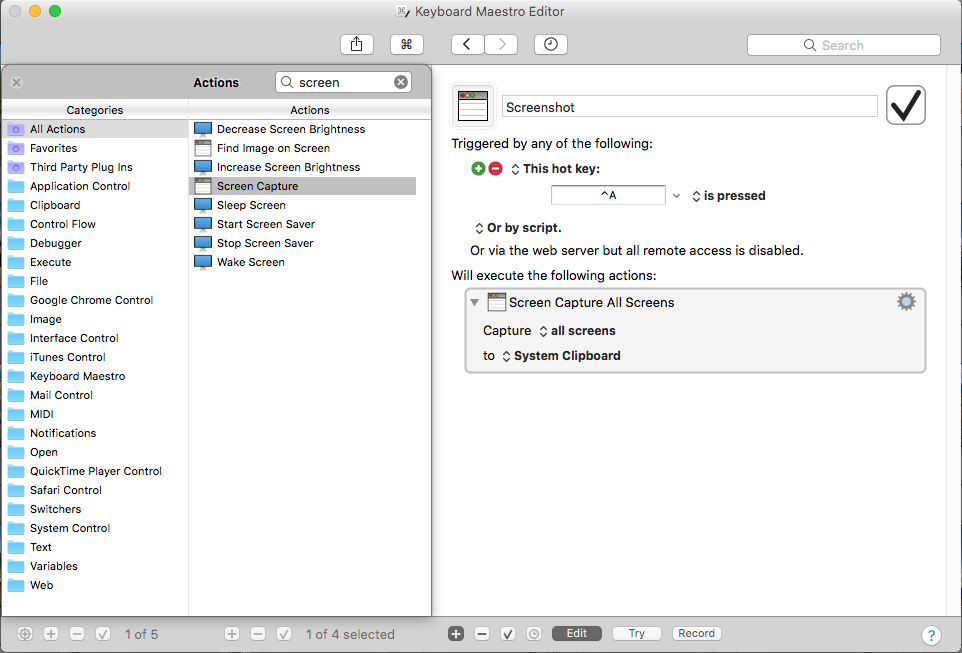
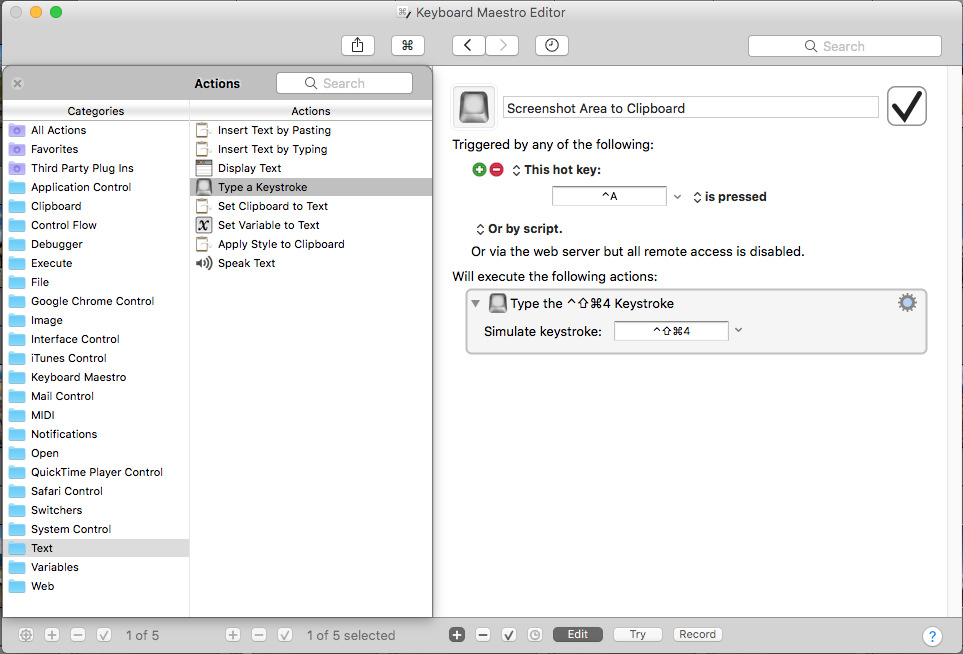
Capture your all (A) your screen(s) to the clipboard using control-a via the Keyboard Maestro built-in actions:
Capture screenshot to clipboard using “control+a” hotkey or keyboard shortcut
In the next example, we use “control+a” to map to “control+command+shift+4” in order to take a screengrab of an area (A) and store it in the clipboard. Your cursor will change, and the image is saved to your clipboard to paste into Slack, Gmail, etc.:
Taking a screengrab to your clipboard with with Keyboard Maestro on macOS
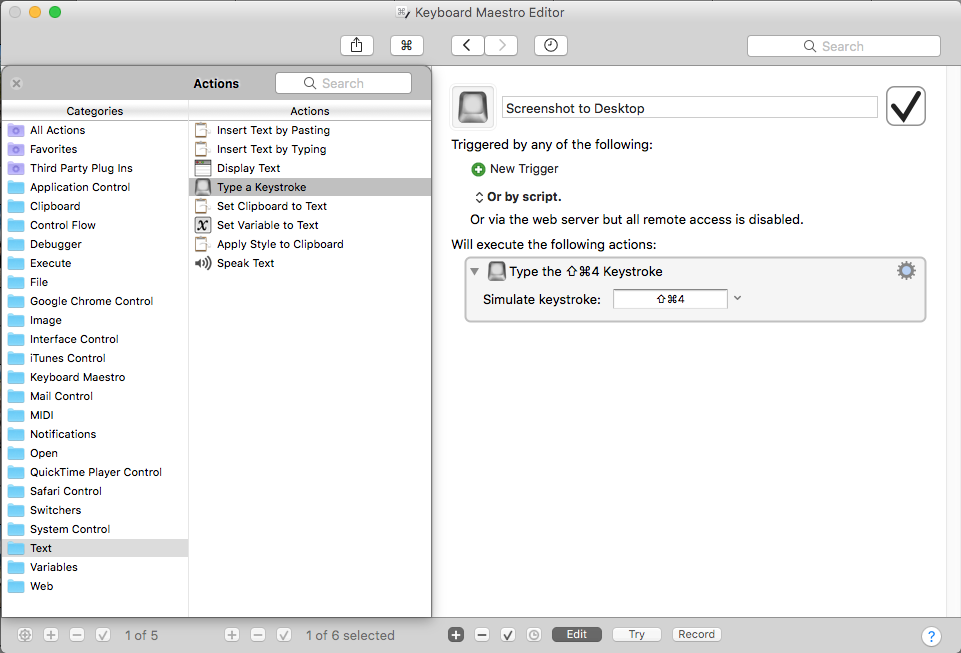
Setting up a control+d shortcut to save your screengrab area as a file on your desktop (D):
Control+D to save screen grab area to desktop with Keyboard Maestro on Apple MacOS (OSX)
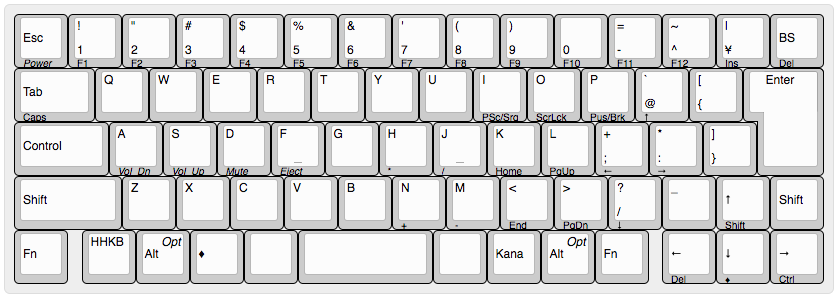
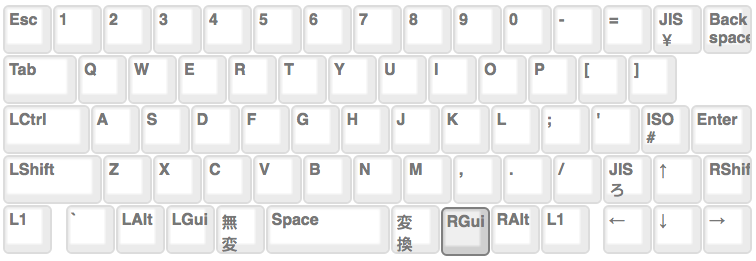
Having recently received Hasu’s fantastic HHKB JP Bluetooth Controller, I noticed one irksome thing: the alt and command keys were reversed on the left hand side, and the kana key that I typically remap to right command was reverted.
This is normal: the keyboard targets Windows users primarily, but one thing you lose when upgrading to the Hasu controller are the dip switches that allow changing the role of caps lock, the arrow keys and setting it to macOS mode.
The default HHKB JP OSX layout without Hasu controller – link
Of course it’s a pretty easy change to fix: you simply need to head over to the TMK Keymap Editor and edit the current layout, then download the hex file and flash it, but I’ve done the work, so I might as well share!
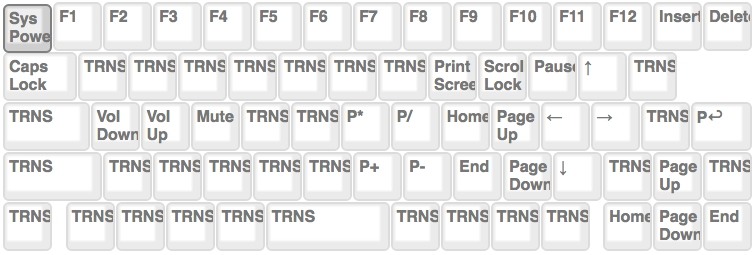
A layout that reverses alt and command and sets the kana key to right command for use with macOS computersAn overview of the second layer (layer1, counting from 0) used in the Hasu HHKB JP default layout
First off, as in other tutorials, you’ll need the DFU/AVR tools installed in OSX. This is accomplished by using Homebrew.
The code to get these installed is as follows:
brew tap osx-cross/avr

brew install avr-libc dfu-programmer
Next up, you’ll need to download the layout hex file that I have compiled here: “mac_version.hex“. If, for whatever reason, you need to go back to the default firmware, I have that compiled as well: default.hex. Remember to unzip these files prior to using them if Safari doesn’t automatically unzip your downloads.
Finally, put the keyboard in DFU mode by pressing the button on the back of the controller, where the dip switches used to reside. You may need to remove the cover to do so, and note that you can use the cover if you have short fingernails.
Once in DFU mode, this one-liner will erase the firmware, load the new hex layout and reset the keyboard so that you can use it once again. Note that I’m assuming your hex file will be in the Downloads folder in your home directory, and I’d also recommend having a spare keyboard handy in case anything goes wrong.
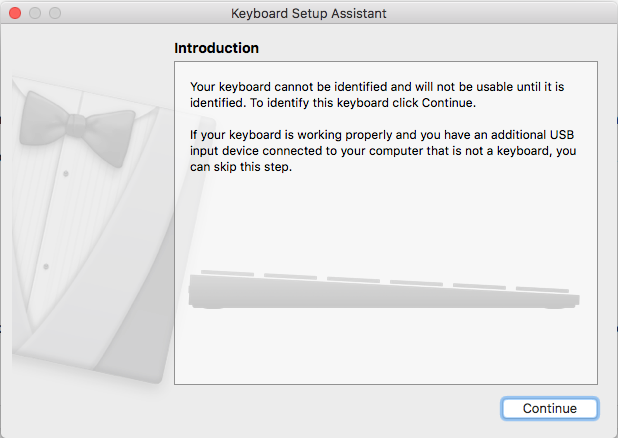
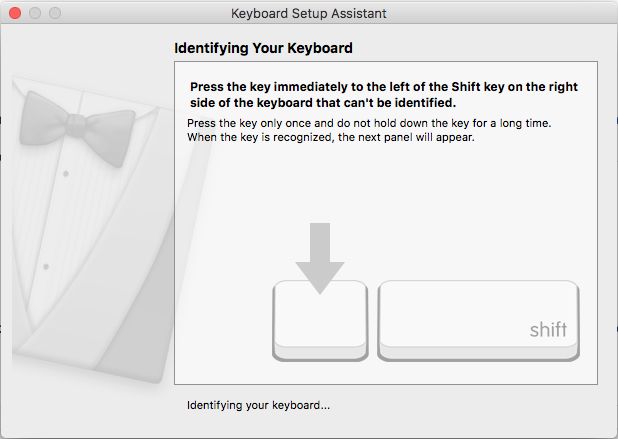
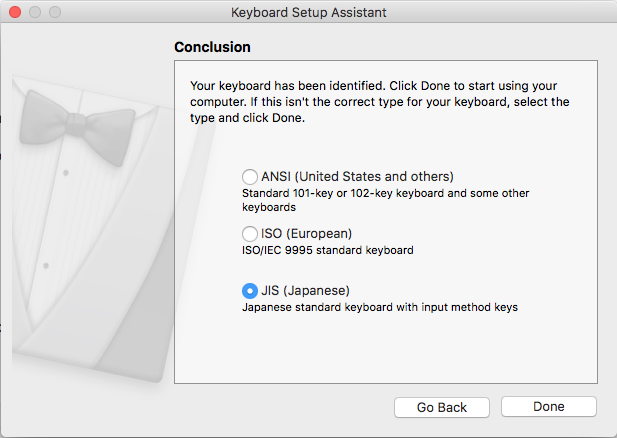
Finally, if your layout is still a bit odd (underscore and pipe not working), you may have set the keyboard to the wrong layout. In Apple OSX this can be done by opening the keyboard section of the settings and changing the keyboard layout. Note that it doesn’t really matter that ANSI is suggested when you hit shift+z, shift+?, but that you select JIS once completed, like so:
Open the keyboard panel in System Preferences, then click “Change Keyboard Type…” on the bottom leftClick continue (or press return) to start the detection wizardPress shift+z, then shift+? as instructedSelect the JIS radio button, even though it defaults to ANSI
This how-to on Windows Salt minions will just scratch the surface of the power behind Salt, and will cover remote execution, installation and management.
Please note: I’m new to Salt, and I’m a recovering Windows syasdamin from the 2000-2013 era. This means I probably have a bunch of out-moded ways of working with Windows.
To this end, this first question would be: why? Active Directory and associated policies do a good job of managing Wintel already. I’ve had luck in the past managing hundreds, thousands of servers, desktops and laptops using the tools Microsoft provides without too much issue, and I’ve heard things only got better since I left for greener pastures.
The easy answer is that many organisations may now find themselves with a combination of Linux and Windows servers, Windows and macOS workstations, coupled with the odd BSD system here and there, Linux desktops and Unix servers.
What Salt allows for is a management platform that covers all of these platforms with a common language that is easy to read and hack away at (YAML) and very extensible using a programming language with a relatively gentle learning curve (Python).
In my case, most things running at home are either running OSX or some version of Linux/BSD, but there are a few of oddball Windows 10 computers doing things Microsoft-based computers do pretty well; gaming, spreadsheets, touchscreen-enabled full-desktops.
The idea of managing Windows computers with Salt came to me pretty late into the journey through the docs, but hit me like a freight-train as these are often the computers that require the most maintenance for me personally, meaning reinstalls, reconfiguration and general “care and feeding”. Having gone down the path of running my own Active Directory at home a few times and finally settling on a couple of Apple “servers”, this seemed like a pretty good work-around that wouldn’t introduce much pain.
The first caveat, however, was that I was unable to get Windows-based Salt minions to be accepted by OSX-based Salt masters. Not the end of the world, but it meant running Docker or a Vagrant box to handle the Windows 10 computers. I ended up simply installing Salt on an Ubuntu-based storage server I already had running that had recently been upgraded to Xenial instead, but I’m most likely going to be revisiting this architecture in the long-term.
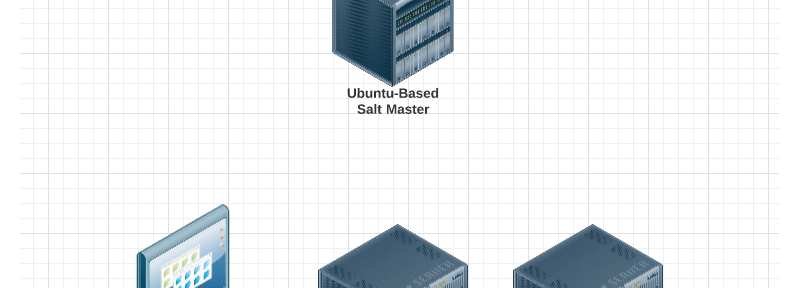
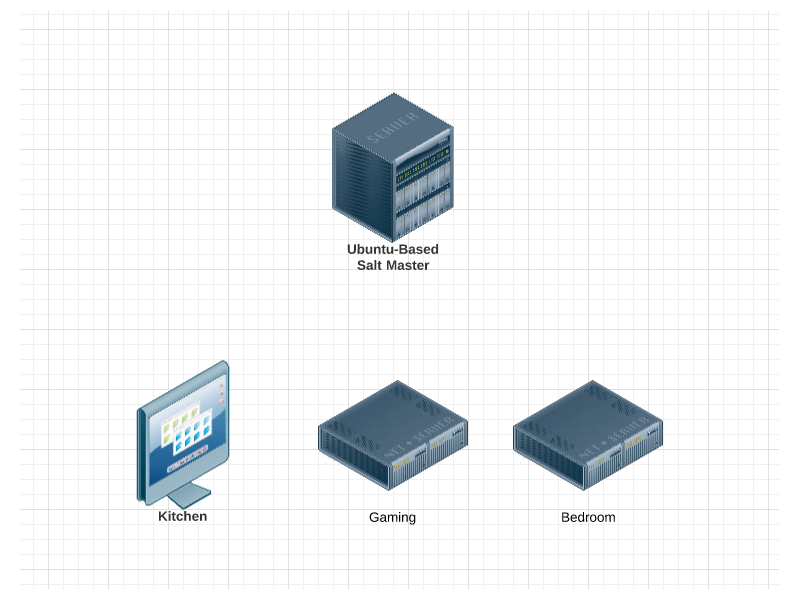
Now that we have that out of the way, here’s the general architecture of what I’ll be going over:
A simple Windows Salt Minions example with one Salt Stack master running Ubuntu Linux
The Nitty Gritty – Deploying Salt Minion Services to All of Your Windows Nodes
I’ll come right out and say that I cheated when it came to installing the Minion service on the nodes at home in that I already had Chocolatey installed, and that I simply used the default salt hostname for the master by adding it the the static DNS entries on my DNS server.
This last bit, the part about the DNS server, might be a luxury depending on your install location. I also can’t expect that Chocolatey is installed everywhere, but just quickly, here’s how that scenario works:
Install Salt Master and start the service on a computer in your network
Ensure that there is a DHCP reservation for the IP of this node
Add a DNS entry salt for that DHCP-reserved IP
Install the Salt minions via choco install -y saltminion on the Windows hosts
Accept the keys on the Linux master via salt-key -A
Should you have to go about this a different way, you can point an alias (CNAME) to the hostname in your network, OR add a manual host entry to your nodes (I’ve used Group Policy to do this in the past, with network scripts), or finally, you can simply change the Salt Minion config to point to the new hostname.
As for the deployment of the Salt Minion service and binaries, you could do this over RDP for a few hosts, Group Policy, or via psexec:
This snippet will install the Salt Minion service, configure it to point at `SALTMASTER` (replace this with the hostname you’d prefer) then start the service. Note: as mentioned above, I haven’t tested this myself!
The most up-to-date Salt Minion binaries can be found here: https://docs.saltstack.com/en/latest/topics/installation/windows.html Should the version change, you’ll want to update that one-liner as well.
Accepting the Minions
Assuming you’ve got your minions now sending requests to the Salt master node, you need to approve them.
On the master node running Linux, this can be done like so:
sudo salt-key -A
You’ll be greeted with a list of nodes to be accepted, and you can take a moment to note the names and accept them:
user@ubuntu:/srv/salt# sudo salt-key -A
[sudo] password for user:
The following keys are going to be accepted:
Unaccepted Keys:
WINDOWSGAMES
Proceed? [n/Y]
Key for minion WINDOWSGAMES accepted.
user@ubuntu:/srv/salt#
Testing the Minions
Now that you have minions installed and working, let’s run a quick test that proves we can run remote commands on them. Note that this is just scratching the surface, and that “push commands” are just one way of working with Salt Stack, you can also have the nodes “pull” from the Salt master on a regular basis.
Sample run command:
sudo salt -G 'os:windows` cmd.run 'dir'
This should give you a directory listing on each of the nodes, like so:
WINDOWSGAMES:
 Volume in drive C has no label.
 Volume Serial Number is 3FF7-A973

 Directory of C:\Windows\system32\config\systemprofile

 07/16/2016 04:47 AM <DIR> .
 07/16/2016 04:47 AM <DIR> ..
 07/16/2016 04:47 AM <DIR> AppData
 0 File(s) 0 bytes
 3 Dir(s) 66,483,965,952 bytes free
Package Management on the Master Node
You’ve got a few options for package management for Windows Salt minions:
Chocolatey packages
Cygwin Packages
Master-shared packages (WinRepo)
Personally, I’m currently using Chocolatey package management because it’s what I’m used to, but I certainly do still use Cygwin for development purposes from time-to-time since Windows Bash mode has still yet to become commonplace. The third option, however, is probably the most scalable, and more user-friendly.
To get started with Windows repositories on the Linux Salt master, you’ll need to run:
sudo salt-run winrepo.update_git_repos
This means that you now have a repository for Windows packages on the Master node, but also note that these don’t come with binaries – they will fetch and send them as needed. I can see this as both good and bad, in a corporate setting you’ll want to create your own SLS files and point them to known-good sources.
To install a package on all of your Windows remote nodes using the Linux Salt master repository:
sudo salt -G 'os:windows' package.install 'firefox'
Note that if ever you want to specify a specific action for a node in particular, that’s done like so:
sudo salt 'WINDOWSGAMES' pkg.install 'firefox'
I’m trying to follow the “pets vs cattle” paradigm here, though you can also use -G to specify groups of servers/workstations/laptops which can overlap in order to manage things in a more granular approach (bit of a pun here, the G is for Grains).
Useful Commands for Windows Salt Minions
In no particular order, here’s a quick dump of the commands I used during my first weekend managing Salt minions at home running Windows 10.
Show installed applications:
sudo salt -G 'os:windows' pkg.list_pkgs
List current Salt minion keys:
sudo salt-key -L
Delete an old Salt minion key:
sudo salt-key -d WINDOWSGAMES
Check if a service is available:
sudo salt -G 'os:windows' service.available 'salt-minion'
Restart a service:
sudo salt -G 'os:windows' service.restart 'salt-minion'
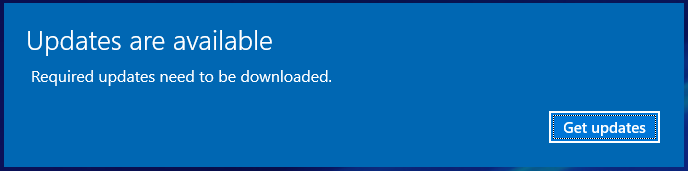
I had taken quite the hiatus from Windows gaming while I worked on certification, but got a chance to have some quick Overwatch sessions last night, only to have one of the competitive matches interrupted by a popup that took me out of the game (I was able to alt-tab back in) that stated the following: “Updates Are Available. Required Updates need to be downloaded”.
Thanks for letting me know about the updates, but interrupting all apps is not the best user experience
Now don’t get me wrong, this is normally fine, but when you’re in the middle of something, say a movie, intense game, conference call or presentation, this behaviour is pretty awful.
No fear, however, there’s a fix, though definitely not obvious. Let’s disable the Windows 10 update notification. We’ll be using the cmd.exe tool in order to run the following script found on StackExchange:
cd /d "%Windir%\System32"
takeown /F MusNotification.exe
icacls MusNotification.exe /deny Everyone:(X)
takeown /F MusNotificationUx.exe
icacls MusNotificationUx.exe /deny Everyone:(X)
rem
This essentially denies the system from running the app itself, which will stop the popup.
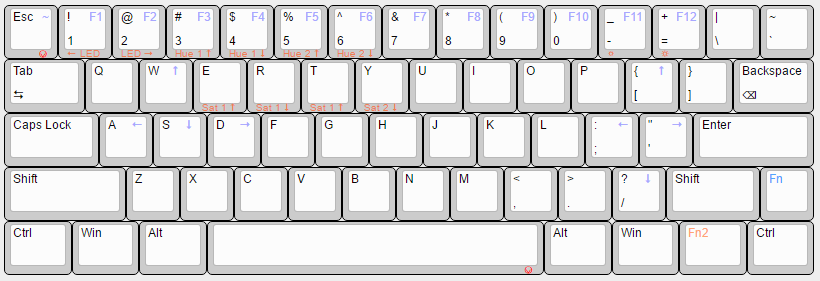
I’ve really been enjoying the programmable firmware on the Zeal60 keyboard PCB from ZealPC. It’s definitely not all the bells and whistles, this layout gives you 62 keys in total, though you might need a keycap set that supports all of these keys. I’m currently using the Originative Co  Modern Beige set, though I hear most  (if not all) GMK sets would also  accommodate  this.
This layout addresses something I sorely needed: the ` and ~ keys (used with Github, Â Bash and Slack on a daily basis).
In order to accomplish this, I need to edit the keymap.c and config.h files, which allowed me to generate a zeal60_rmac.hex file for use with the QMK flasher tool (Win/Mac/Lin).
In order to follow the Zeal example, I also made a zeal60_keymap_rmac.bat file, which can be used with Windows.
Hope you enjoy this! It took a bit of doing, but was well worth it 🙂
Note that the files in question do a good job of walking you through the mods, making it rather easy. The one caveat was the tilde key being on a different row, as there’s only 13 spots per row, but that’s covered in the comments anyway.
As for the batch file for windows,  you can see that it’s really a combination of the config.h and keymap.c files, to a certain extent, so copying and pasting the modified bits did the trick.
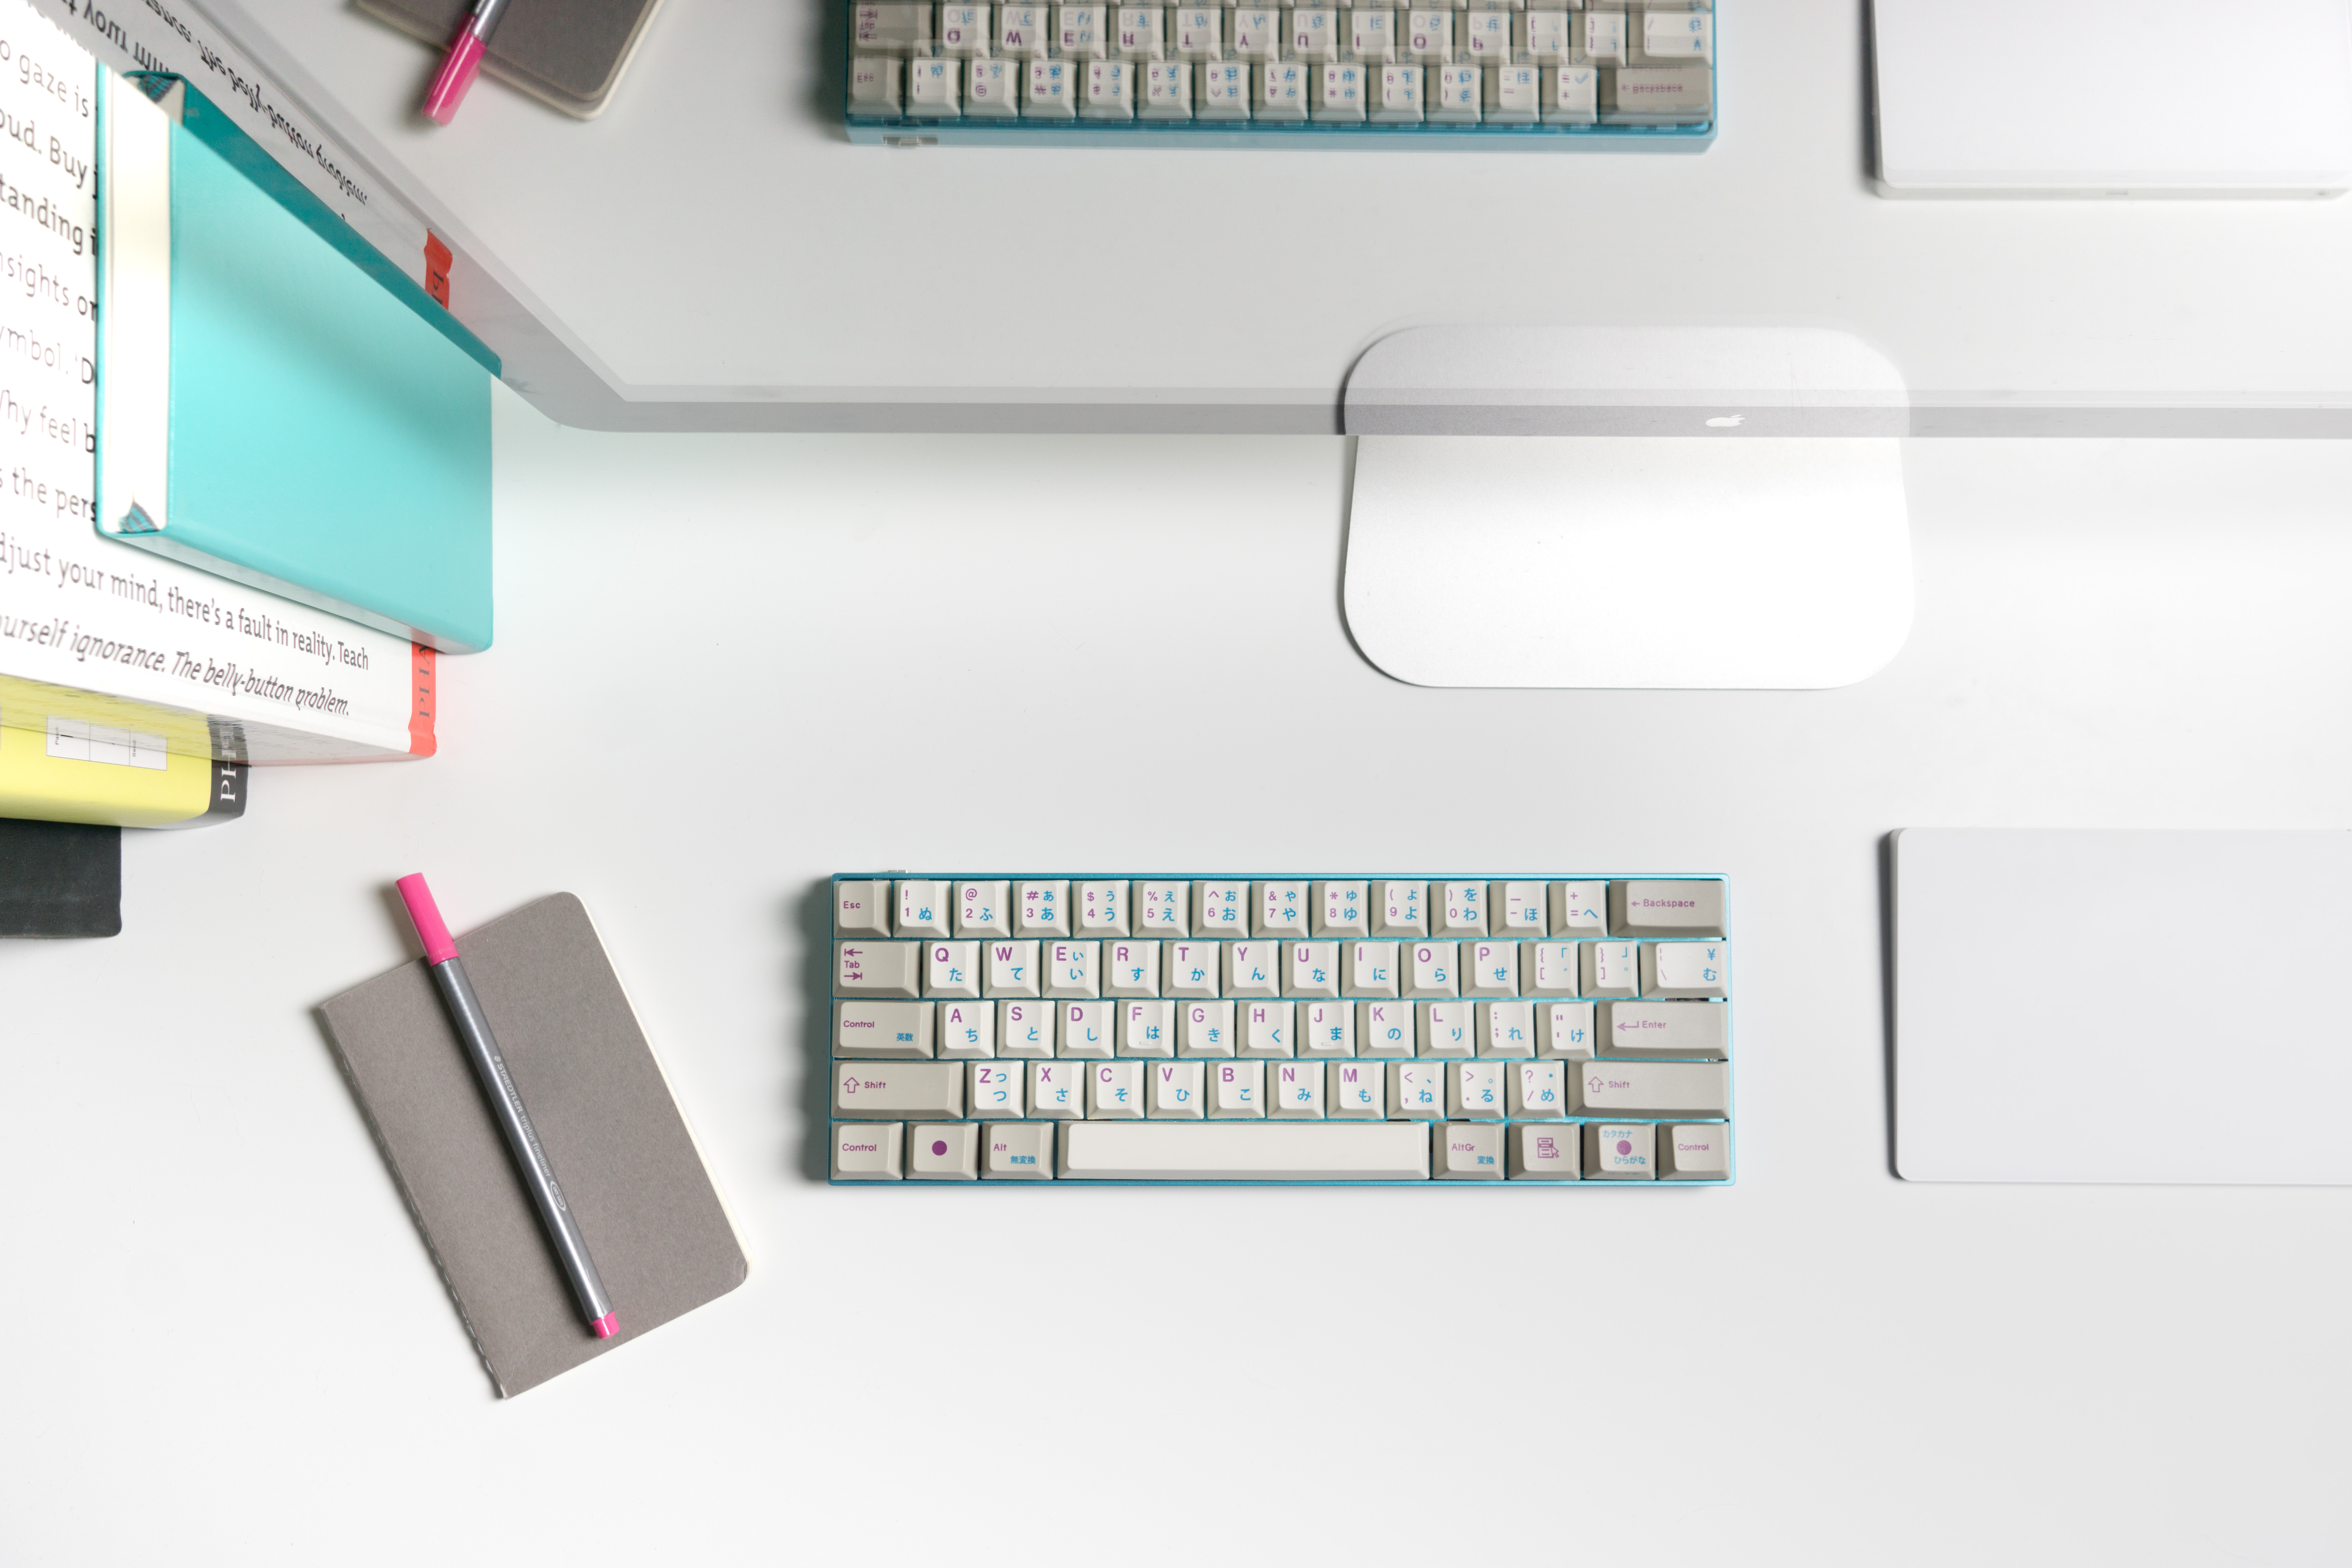
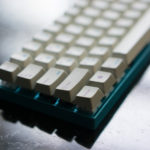
The finished product – a ZealPC Zeal60 with holtite mod, Zealiostotlespacers, Originative Modern Beige Japanese keycaps resting in a Sentraq teal aluminum 60% case with teal plate.
After much research, I decided to assemble a keyboard using hand-picked parts.
The goals of this build were a bit lofty, but luckily I prevailed in the end:
Cold-swappable switches in case I change my mind later
Almost silent typing that would be safe for work
Tactile feeling on the keys when typing
The option to use backlighting at night
A small footprint so I could bring the keyboard home for the weekend
The board should be programmable and support multiple layouts
The keyboard should be as flat as possible
There should be no “ping” from the case
There should be no flex in the PCB when installing switches
Keycaps that fit Zealencios properly – Cherry profile thick keycaps
This led me to a few easy decisions: I would go with a ZealPC Zeal60 as it supported SMD LEDs, was programmable via QMK, was 60%. I’d also opt for Zealio 65g switches as they had great tactile response, and were fairly quiet when combined with Zealencios.
What I didn’t see coming was the arrival of the test Aristotle stems (via /r/mechmarket) and a last-minute purchase of JSpacers from The Van Keyboard. These were for two different projects, respectively: Gatistoles and Jailhoused Outemu blues. During those projects I got to wondering if I could mix the results, and sure enough, figured out a way to add JSpacers to Gatistoles. Not satisfied, I ended up trying this same mod in a Zealio housing, and then to seal the deal, put some Zealencios on top. This led to a tactile switch that was very quiet – more so than a typical dome keyboard.
Parts required for a “Zealiostotlespacer” – The Van Keyboard JSpacers (black rubber, bottom left), Zealios Switches (purple switch, middle), Aristotle switch stems (white, top right), and Zealencios (clear, top left). This creates a tactile, non-wobbly switch that is both satisfying and almost silent.
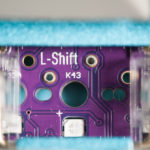
In order to be able to cold-swap switches as with the TeamWolf Zhuque+ and PC Gaming Master Race Mechanical Keyboard, I’d need to sort out a way to replicate the recepticles each of these boards implement. After doing a lot of research into LED sip sockets that might work, I stumbled across a Linus Tech Tips forum post about something called “holtites” which were used for this purpose. A few Reddit searches later I found out that the TE AMP connectors would fit the bill, and made a spur of the moment DigiKey order.
TE Connectivity AMP Holtites – these allow you to “cold-swap” switches without desoldering, perfect for testing different switch typesHere you can see the Holtites installed in the Zeal60 board – they are flush-inserted using a spudger and a rotating motion to keep them snug.
Now that I had the switches and board picked out, I was left with a tough decision regarding the case and plate. Nothing I could find actually had the proper mounting standoffs for the Zeal60 PCB, most were of the “Poker” variety, which were missing top screw standoffs, as well as one lower-left. It looked like I had to compromise, and seeing as most 60% cases seemed to be incredibly similar, I ended up going with a Sentraq aluminum case and plate based on looks alone. I ended up getting a cyan case and plate, as well as purple versions of the same, intending to try and colour match the Zeal60. It later turned out that I preferred the cyan varieties, which you’ll see in the shots.
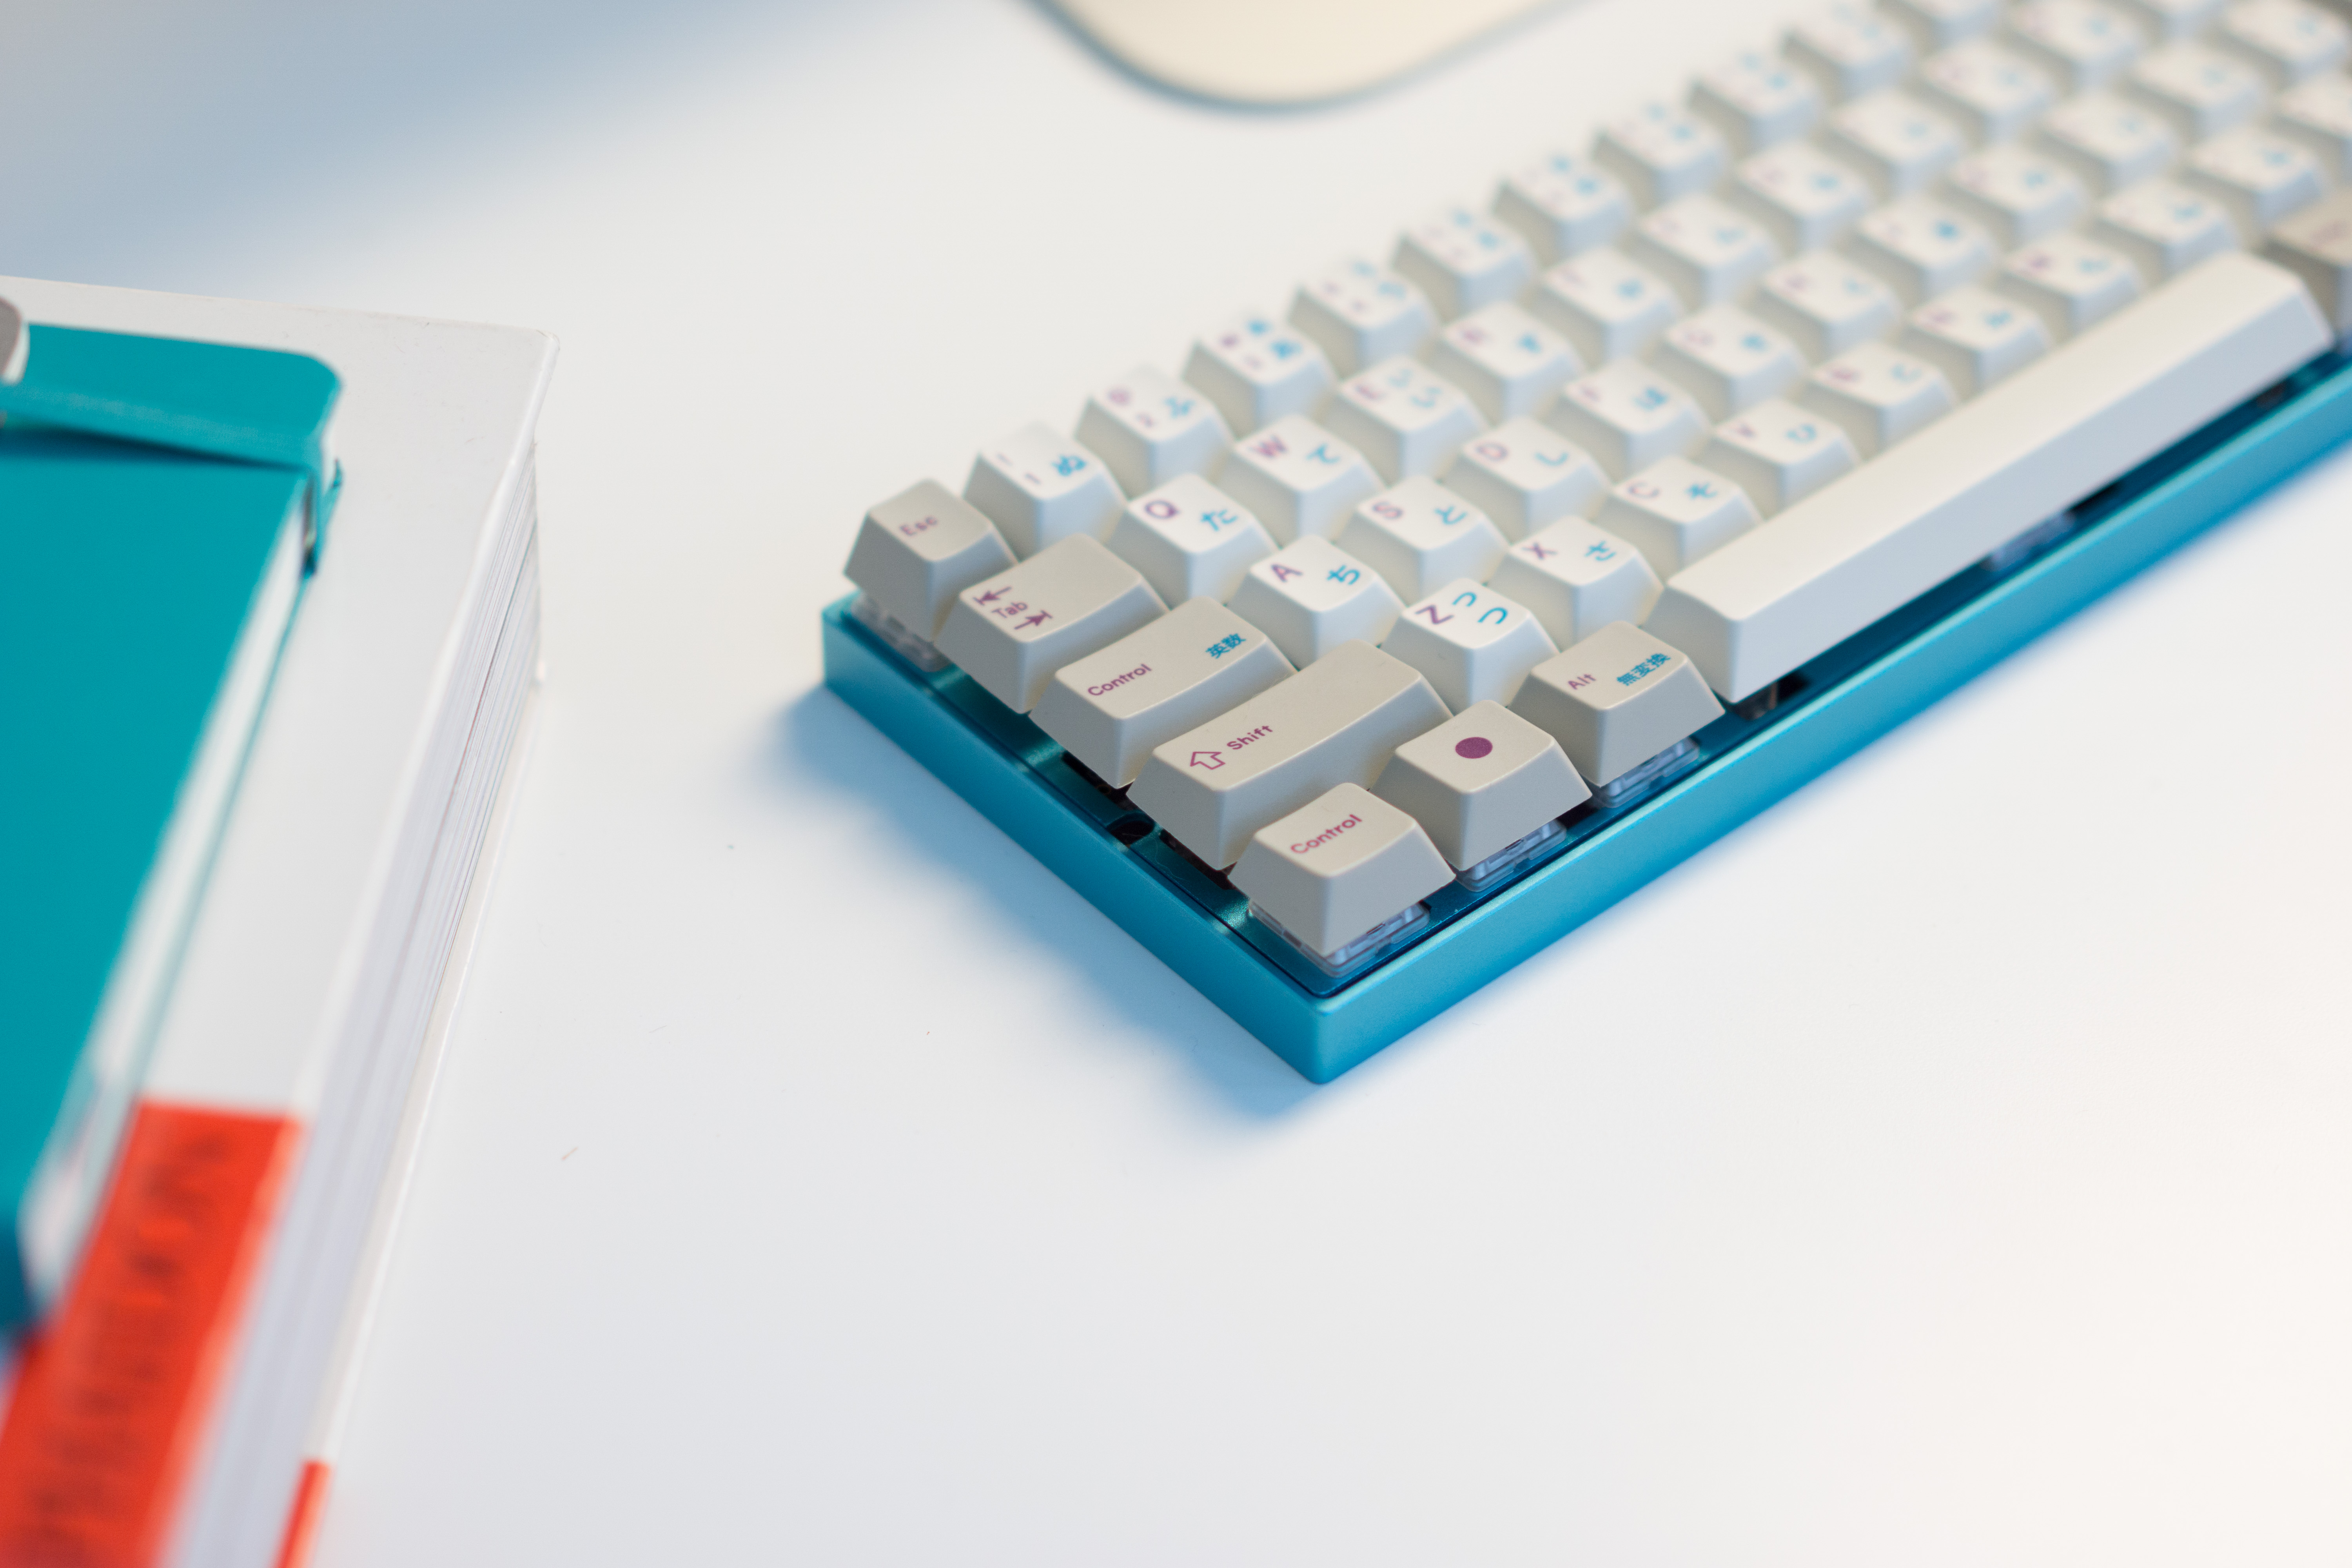
A pretty good match – the Sentraq teal aluminum case fit the purple legends with teal kana subscript
The Sentraq case with the Zeal60 is not without problems: both cases prohibited me from screwing in the leftmost PCB screw, and both seemed to have the wrong thread on the top left standoff. Nothing altogether impossible to get around, but disconcerting all the same. Furthermore, the fit and finish of the top plate in the case wasn’t great, causing the right side to be less snug than the left. All of this to say: I’m still on the lookout for a case and plate that fit well together, and have not ruled out making my own.
The Sentraq plate and case are pretty snug, but there’s definitely room for improvement. That being said, this is a 1:1 macro…
As for the keycaps, I searched all over, asked around and tried a few OEM samples and was not satisfied. I ended up purchasing an Originative Co Modern Beige purple set with kana legends which I am happy with in terms of looks, fit and sound, but am not sure they are fit for work. In other words – I’m still looking for a good set of keycaps. I’ve been told GMK might be the best call for the Aristotle stems, and as soon as I have a sample of them, I’ll report back.
Originative Co Modern Beige with purple legends and cyan kana keycapsThe Cherry profile is perfect for the Zealencios, which didn’t work very well with the OEM keycaps I had tried previously.
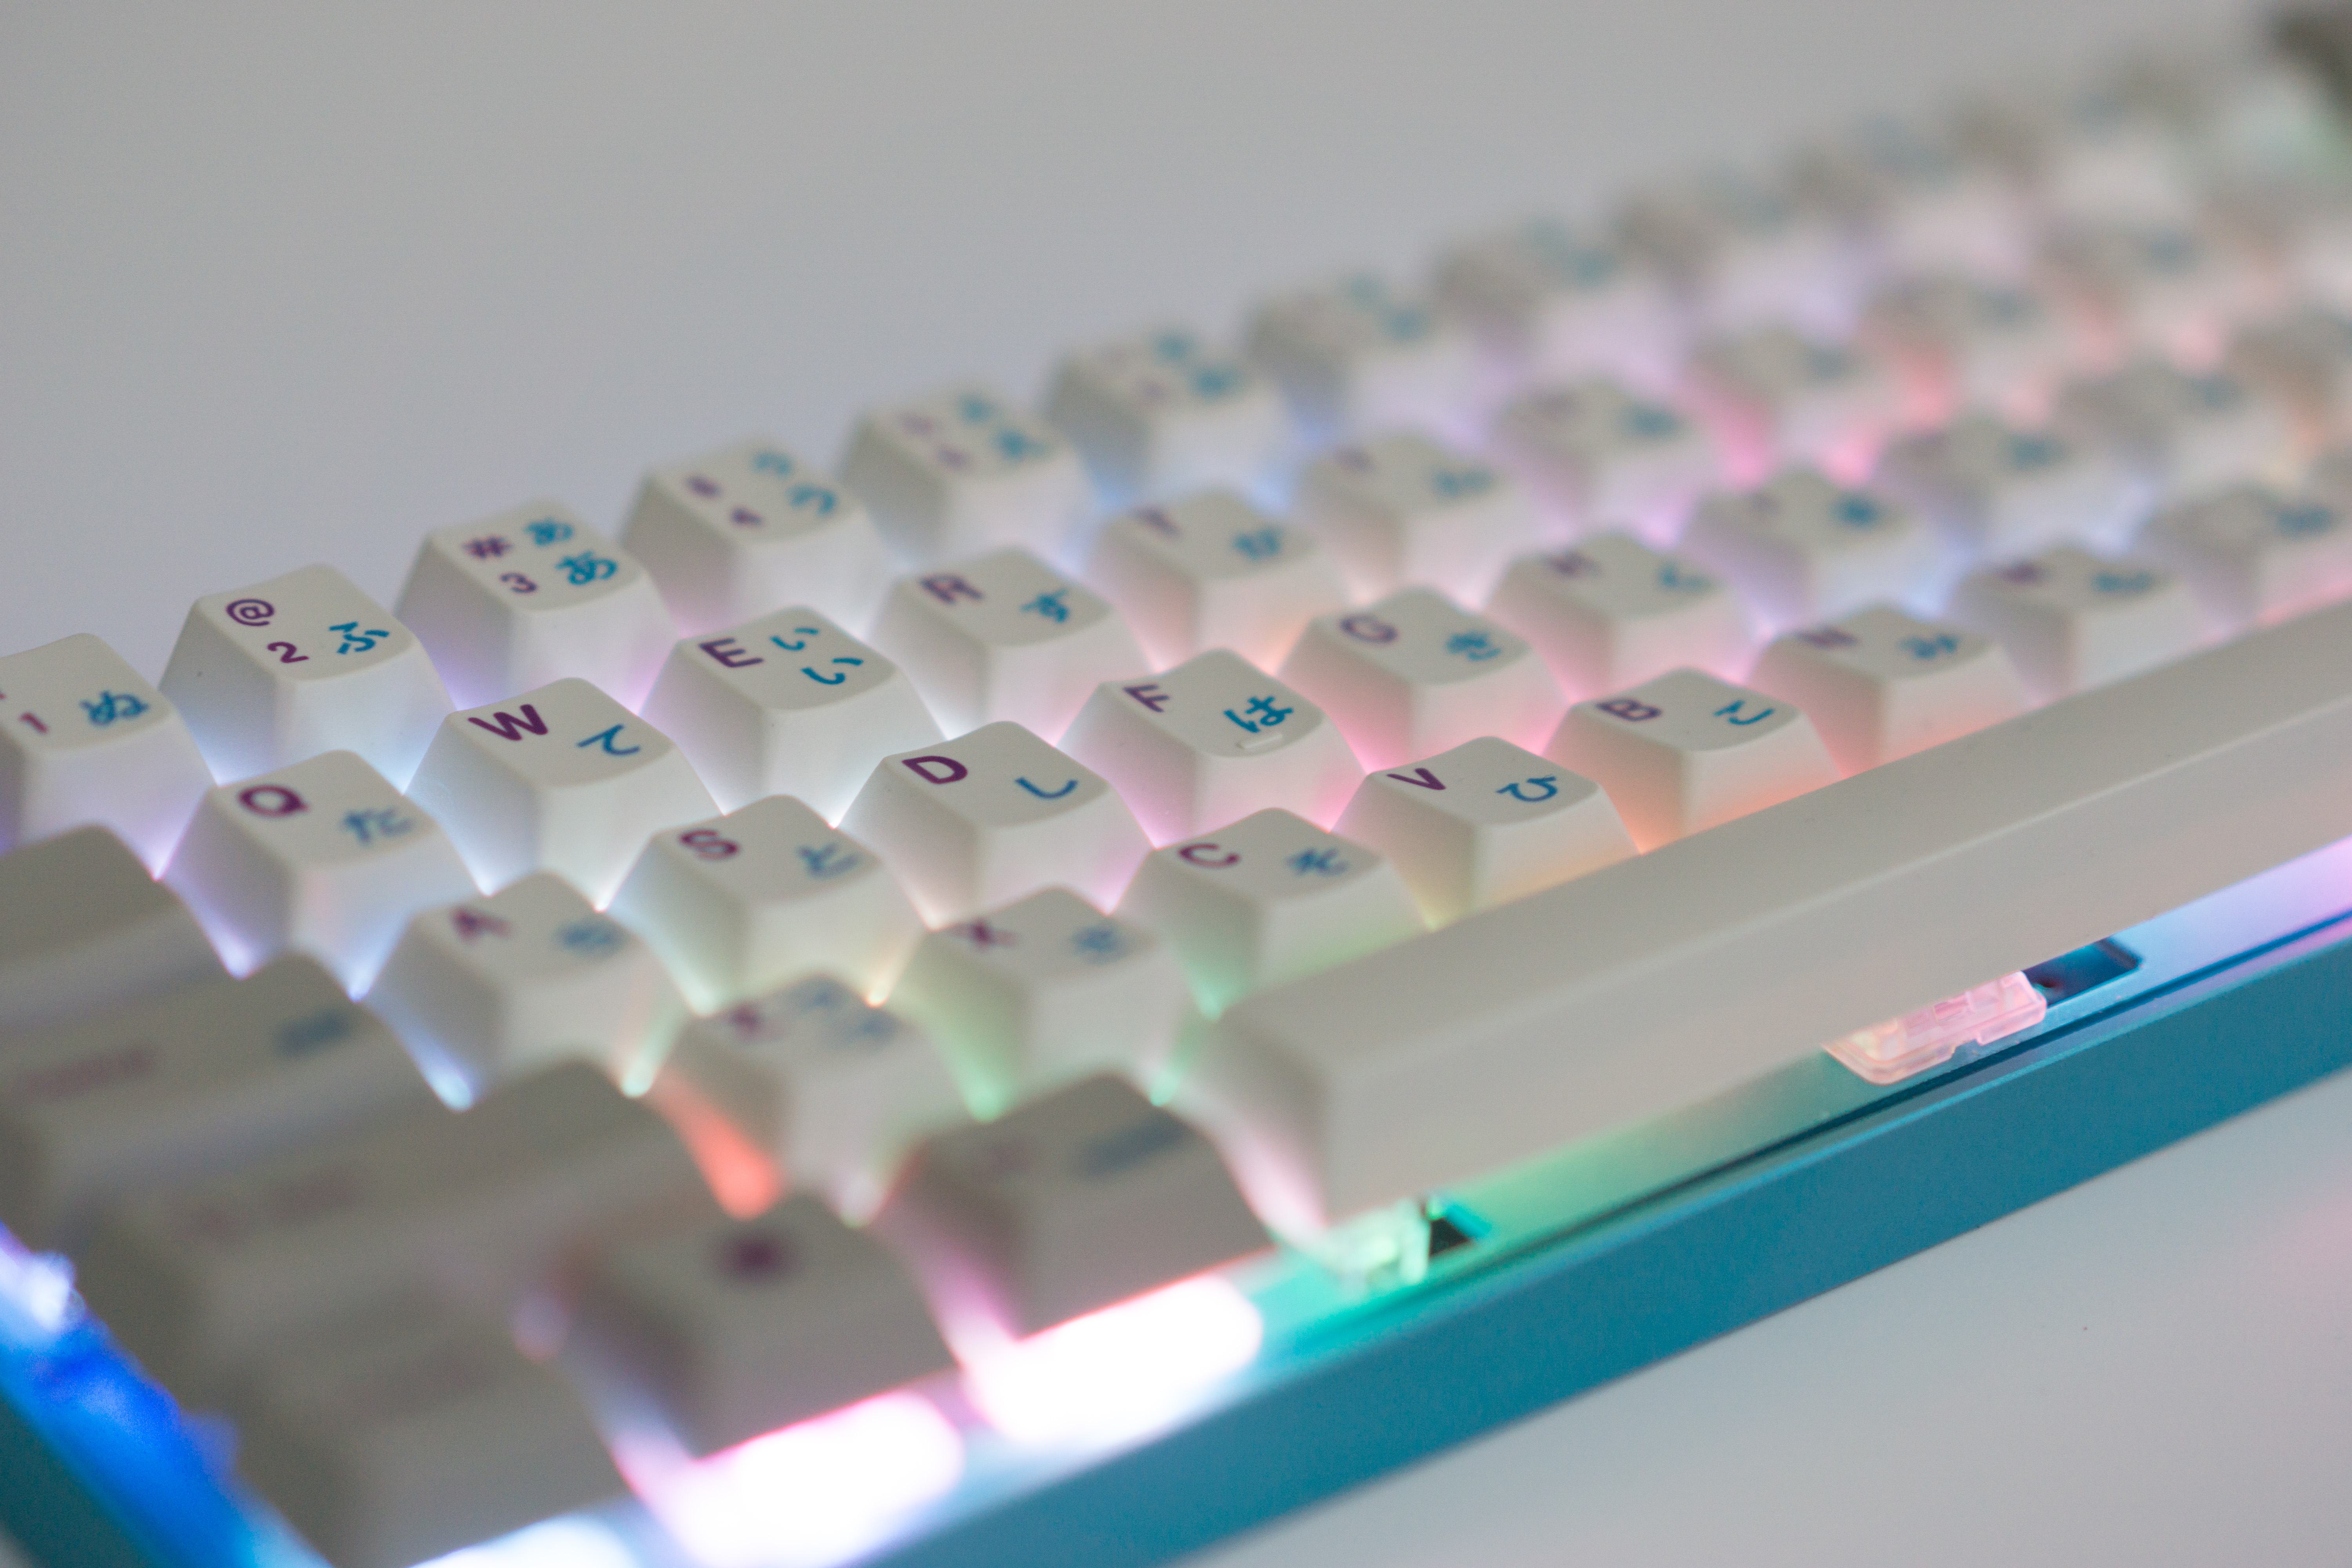
Finally, regarding the LEDs: though I was not at all interested in RGB LEDs (preferring white when possible), I ended up actually really liking the default rainbow profile (fn1+2). This is a bit colourful for most, but as I have them turned off most of the time, the assumption is that I’ll be the only one seeing them.
The SMD LEDs are fairly bright when set to max!
Gallery of the rest of the shots from this set:
The SMD LEDs are fairly bright when set to max!
Yet another shot of the LEDs – I’m impressed with the work ZealPC put into these. They are on the back of the PCB so your keycaps don’t hit them when you depress keys.
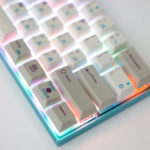
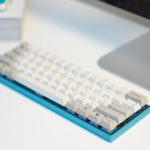
It fits right in on the photo desk, though I’ve yet to try it while gaming…
Originative Co Modern Beige with purple legends and cyan kana keycaps
I find the SMD LEDs a bit distracting at full brightness during the day, and typically set them to two notches above off at night.
Turn on the bright lights – these SMD LEDs are fairly bright. Please ignore the molded USB mini cable, it’s got to go.
So many parts involved in creating a Zealiostotlespacer.
Another fit and finish shot of the Sentraq teal aluminum case and plate. I still think these Originative Modern Beige keycaps are a great match!
The Sentraq plate and case are pretty snug, but there’s definitely room for improvement. That being said, this is a 1:1 macro…
Here you can see the Holtites installed in the Zeal60 board – they are flush-inserted using a spudger and a rotating motion to keep them snug.
A close-up of the TE Connectivity AMP Holtites purchased from Digi Key.
Here you can see the TE Connectivity Holtites installed on the Zeal60 PCB. You can also see the clear and gold Zeal stabilizers, and a dog hair 🙂
TE Connectivity AMP Holtites – these allow you to “cold-swap” switches without desoldering, perfect for testing different switch types
Spotlight on the TE Connectivity AMP Holtites (silver, left) and the JSpacers from The Van Keyboard (black, right)
So many colours! The SMD LEDs were a win, though I wasn’t convinced that I wanted them at first.
At lower brightness these aren’t distracting at all.
Shot in the darkness – I’m really liking the “rainbow” effect.
The finished product – a ZealPC Zeal60 with holtite mod, Zealiostotlespacers, Originative Co Modern Beige purple + kana keycaps resting in a Sentraq teal aluminum 60% case with teal plate.
I’m really liking the feel of these keys – it’s hard to get over the way they feel as it’s nothing like anything I’ve tried before.
The Cherry profile is perfect for the Zealencios, which didn’t work very well with Gateron or OEM keycaps I had tried previously.
A pretty good match – the Sentraq teal aluminum case fit the purple legends with teal kana subscript
Some detail of the case and plate fit and finish.
Another profile shot of the custom keyboard at work. Note that it’s missing a cable, I’m still on the lookout for a good “birthday cake” paracord cable.